Virtual Disk Manager 99, is a disk manager program that can handle
three types of "drives":
Starting with version 2.0, VDM99 also offers database support: You can "scan" a disk and store the characteristics of the disk and all its files into an MS Access database. You can then browse the database, or query it in various manners to locate a disk or a file, find on which disk a given file resides, etc. Note that the workspace file format changed with version 2, so you cannot reuse workspaces saved with version 1.x.
Finally, you can select an "advanced mode" in which two extra panes appear: a sector map of the current disk, and a sector editor. This mode also offers a sophisticated search-and-replace function, sector copy and compare functions, etc.
Here are a few screen shots: normal mode (editing file properties), advanced mode (editing a sector), and database mode (browsing records while displaying queries).
Tree View
List View
Sector map
Sector Editor
Database support
Main menu
Drive menu
Disk menu
File menu
Sector menu
Edit menu
View menu
Database menu
Setup menu
Help menu
Legal disclaimer. Read this first.
The contents of this webpage are for educative purposes only. I'm not a professional programmer, and therefore I cannot guarantee that the program described in here will function properly. In fact, it probably won't. It may even cause damage to your computer. And quite possibly set it on fire and burn your house to ashes, sending toxic fumes in the whole neighbourhood. Actually, it may even kill you. So if you know where your interest is, don't install it! Don't even think of it. Furthermore, be aware that using some of the third-party software included with this package may constitute a copyright violation, an infringement on FCC regulations, a federal crime or whatever it is called in the country you live in. You have been warned! By reading this page further and/or installing the software described herein, you agree on taking whole legal and moral responsability for any disapointment, loss of data, damage, accident, catastrophe, or apocalypse that this package may directly or indirectly cause or favor. And if you were thinking of suing me, forget it. I may have an MD but I'm only a scientist: I don't have any money.
The program detailed below is copyrighted by me, Thierry Nouspikel, till the end of time or 50 years after my death, whichever occurs first. I grant you the right (but not the exclusive rights) to use it, and even to distribute it, as long as you understand that I take no responsability for it. If you distribute it, be sure to include my copyright and a link to the present webpage. Thanks.
To establish communications with a remote TI-99/4A via a serial or parallel
cable, you should first setup communications with "Setup-->Options", then
transfer a communication routine to the TI-99/4A with "Setup-->Upload hook".
You only need to do this once, as VDM99 will remember the settings you
made, and you will be able to copy the communication routine to a TI-99/4A
disk once and for all. See below for details.
To view drives on the remote TI-99/4A, load and run the desired "hook"
routine on the TI-99/4A, then do "Drive-->Scan remote TI-99/4A". A list
of available drives appears. Click on one of them to view its contents
and the disk name (if any) will appear in square brackets after the drive
name: DSK1 [MYDISK].
Registration is very easy:
- From the start menu, select "Run"
- Type into the box: Regsvr32.exe "path\dao3032.dll"
where path is the folder in which dao3032.dll resides. It may be
the VDM99 folder, or you can move the DLL to C:\Windows\MSApps\Dao
if you like.
- Launch VDM99 again, this time it should work.
If you are experiencing difficulties with this registration, try downloading the following installer from Microsoft: http://download.microsoft.com/download/vc40std/patch/1/win98/en-us/daoredis.exe I did not try it personally, since DAO is already on my computer, but I was told it works really well (although some people also reported that it does not work on certain systems...).
NB. If you decide that you don't like the database feature and will never work with it, you can dispense with registering the DLL, but then you must remove "Floppies.mdb" from the VDM99 directory, otherwise VDM99 will attempt to open it upon startup and cause a crash.
A more drastic solution is to download the database-less version of
VDM99, dubbed version 1.9x, from here. The
file VDM99NODB.ZIP contains only one file:VDM99.EXE. You should thus download
and instal VDM99 version 2, then replace VDM99.EXE with the one in the
"noDB" zip file. Note that workspace format is different between version
1 and 2, so delete the file Workspace.VDM, if you don't want to see an
error message. In my opinion, it's a shame not to use the database features,
but if you are part of the unhappy few that cannot install DAO, then using
version 1.9x is your best bet.
This view displays the currently available drives/disks. It consists
in four sub-trees:
To display the contents of a disk/driveThe PC subtree displays virtual drives implemented as PC files containing an image of a TI-99/4A disk. The tree can also have PC folders and "dummy" folders, i.e. folders that only exist within VDM99, for you to arrange your virtual disks. To populate the PC tree, you must select PC files with the "Drive-->Mount PC file" or "Drive-->New PC file" or "Drive-->Mount PC folder" commands. The TI-99/4A subtree displays all drives on the remote TI-99/4A with names matching DSK#, where # can be a digit or a letter. For this to work, a special "hook" routine must run on the TI-99/4A so that VDM99 can control it. Instructions on how to load this routine and setup communications (with Setup-->Options) are provided later in this document. Once this is done, just do "Drive-->Scan remote TI-99/4A" to populate the tree. The Bug99 subtree displays all drives emulated in my Bug99 emulator. If a device is running my IDEAL DSRs, the subtree will also contain a folder called "Floppies" in which your entire floppy collection appears. To populate the tree, make sure Bug99 version 2 or above is running (the emulation does not need to be running, just the program) and select "Drive-->Scan Bug99". The database subtree. You can add a disk to you database by drag-and-dropping it onto the file cabinet icon (the database must be open for this to work). This subtree comprises two built-in folders: a list of queries saved into the database, and a list of use-defined parameters. You can also create you own search queries and they will be added to this subtree.
Very important: if you swap floppies in a TI-99/4A drive, select "Drive-->Refresh" so that VDM99 becomes aware of the change. This is necessary because all remote drives are buffered locally to speed things up (you can disable this feature in the options, if you dislike it, but remote access will be slower...).
To copy a disk
Just drag the source disk and drop it onto another. You will get a
dialog box asking you which type of copy you'd like:
- All sectors: This "clones" the disk, making the destination
a perfect image of the source.
- Sectors marked used: This saves time by copying only the sectors
that are marked as used in the directory of the source disk (disk allocation
bitmap in sector 0).
- All files + disk info: This copies only sector 0, which contains
the disk name and characteristics (e.g. name, size, density, sides), then
it copies all files, one by one. As a result, the destination disk is defragmented,
with all files grouped at the beginning of the disk, in alphabetical order,
each file consisting of a single cluster immediately following its FDR
(file descriptor record).
- All files: Same as above, except the characteristics of the
destination disk remain unchanged. This is especially useful if the disks
have different sizes.
To upload a disk to the TI-99/4A
Place a blank, but formatted disk in one of the TI drives, then drag-and-drop
a disk into it. You can also perform copies between two different TI drives
(with Edit-->Copy or Ctrl-C, followed with Edit-->Paste or Ctrl-V).
To download a disk from the TI-99/4A
You have two solutions: 1) Drag-and-drop a TI drive onto an existing
disk image in the PC tree: the destination file will be overwritten with
the contents of the TI disk.
2) Drag-and-drop a TI drive into a PC folder, a dummy folder, or the
root of the PC subtree. This will create a new PC file to hold the contents
of the TI disk. The "Drive properties" dialog box appears first, so you
can select the format and location of the PC file, then the copy dialog
described above.
More disk commands are available from the Disk menu described below. Selected functions are available from a context menu, which can be displayed by right-clicking on a tree item.
Database commands are described in a dedicated section below.
This view displays a list of files contained in the current disk
(to change the current disk, just click on a disk or drive in the tree
view). When used with database functions, it displays the results of a
query, or the contents of the two folders in the database subtree.
The list layout can be customized with "View-->Customize list": you can decide which information you want to display, set the size of each column and the justification of the text within it.
By default, the disk catalog displays:
The file name
The file format (e.g. DV80 for "display, variable 80").
The file size in sectors, including the FDR. Thus an empty file has
a size of 1.
The protection status.
The date of creation. This is not part of the standard TI file format,
but is a feature of my IDEAL DSRs and other disk managers.
The date of last modification. Ditto.
The location of the File Descriptor Record, i.e. the sector containing
all the file information, including which sectors it uses.
You can order the list in alpha-numerical order by clicking on one of the column headings. Click again to reverse the order. A '^' or 'v' arrowhead indicates which column is used for sorting, and in which direction. Note that you can also resize the columns by draging their separators.
To rename a file
Click on it to select it, then select "File-->Rename" (alternatively,
right-click on a file and select "Rename" from the context menu). Type
the new file name directly into the list, then click anywhere out of the
edit box. Note that the name won't change if another file with the same
name is already on the disk
To copy a file onto another disk
Drag-and-drop it onto a disk/drive in the Tree View.
To upload a file to the TI-99/4A
Place a formated disk into a drive on your TI-99/4A. The disk does
not need to be blank, just make sure there is enough room to receive the
file(s) you're uploading.
Drag-and-drop one or more files onto the drive icon in the tree view.
(You can select several files with Ctrl-click or Shift-click before you
start dragging).
This can also be done with "Edit-->Copy" (Ctrl-C) in the list view,
followed with "Edit-->Paste" (Ctrl-V) in the tree view, but it's less convenient,
as you'll need to select the TI drive before pasting into it, which makes
it the current drive and displays its catalog.
To download a file from from the TI-99/4A
Click on a drive image in the TI-99/4A subtree. If the drive contains
a disk, its contents will be displayed in the List View.
Drag-and-drop the file(s) you want into a PC disk in the tree. Or use
copy-paste as described above.
More file operations are available from the File
menu, described below. Selected functions are available from a context
menu, which can be displayed by right-clicking on a file.
This view is only available in advanced mode, which can be toggled
on/off with "View-->Advanced".
The view consists in a text-based representation of the disk contents, each sector being represented by one letter. By default there are 18 sectors per line (i.e. one double-density track), but you can change this in Setup-->Option. You can also decide whether the map should display all 1440 sectors or stop at the disk size reported in sector 0.
The map is color coded in a very simple way:
- Free sectors are colored green.
- Used sectors are colored blue.
- Sectors beyond the purported disk size are in black.
- Various functions can select sectors, which will be highlighted in
red. You can also use "Edit-->Select/Deselect Sector", "Edit-->Clear
selection" or "Edit-->Edit selection" to mofidy these.
The function of a given sector is coded as follow:
D: disk directory, i.e. sector 0 and 1.
d: ditto, but sector is marked free (very dangerous).
F: sector contains a FDR (file descriptor record) listed in the disk
directory, in sector 1.
f: ditto but sector is marked free (dangerous).
o: Sector is used by a file.
u: ditto, but sector is marked free.
. (dot): sector is not used
_: sector is not used, yet marked as used (may be
a bad sector, or hidden info).
X: sector is beyond end of disk, as reported in sector 0.
x: ditto, but marked as free (weird).
*: sector is used by more than one file (weird)
@: sector is used by several files, including for a FDR
As you may have guessed, D F o . X can be part of a normal disk, all others indicate an abnormal condition that may needs fixing...
The position of the cursor in the map defines the current sector, which is displayed in the sector editor. The sector number is listed in the status bar, at the bottom of the application window.
You can freely navigate in the map with the arrow keys, by clicking on a sector (if you click in between two sectors, the first one is selected), or by using the Sector menu functions or the corresponding toolbar buttons: "Next sector", "Previous sector", "Next track", "Previous track" or "Read sector". A track consists of 9 sectors in single-density disks, and 18 sectors in double-density disks.
You can also select a current file, by dragging-and-dropping a file from the file view into the map or the sector editor. All sectors that are part of this file, including its FDR, will be highlighted in red and its FDR will become the current sector. You can do this for more than one file, in which case all will be highlighted, but only the last one becomes the current file. The name of that file appears in the status bar. You can cancel the current file selection with "Edit-->Clear selection", in which case the status bar will display "No file selected".
Selecting a current file also sets the "stay in file" option, which you can freely toggle on/off with "Sector-->Stay in file". When stay-in-file is on, navigation with "Next sector" and "Previous sector" is confined within the sectors used by the file, in the order they are used. "Next track" and "Previous track" change to "Next cluster" and "Previous cluster", respectively (a cluster is a group of adjacent sectors used consecutively by a file). If you select "Previous sector" when on the first sector of a file, you'll land on its FDR. If the current sector is part of the file, its offset within the file will be displayed after the file name in the status bar.
You can move out of the file by clicking on another sector on the map, but as soon as you use a navigation command from the "Sector" menu you'll be sent back into the current file. To return to disk-wide navigation, just toggle the "Sector-->Stay-in-file" option off.
Various other functions apply to the sector map, e.g. comparison, searches, etc. These are described in the corresponding menus, below. Some functions (copy, compare) require a target disk, which you can select by simply dragging-and-dropping a disk from the Tree view into the Sector Map or the Sector Editor views. Alternatively, you can define the current disk as the target with "Edit-->Select disk as target", but drag-and-drop is more convenient because it does not require changing the current disk. The name of the target disk, if any, is displayed in the status bar.
Selected functions are available from a context menu, which can
be displayed by right-clicking on a sector.
This view also is only available in advanced mode. It provides an
hexadecimal and ASCII view of the current sector (as defined in the map
view). The view is divided into 16 lines of 16 bytes. In the left column
is the hexadecimal address of the first byte in the line, then 16 bytes
are displayed in hexadecimal mode, then the same bytes are displayed as
ASCII (non-printable characters are displayed as spaces).
You can navigate the sector by clicking on a given byte, or by using the arrow keys. The offset of the current byte appears after the sector number in the status bar, in the form xxx: YY where xxx is the sector number (decimal) and YY the current byte offset (hexadecimal).
You can alter the contents of the edited sector by simply typing new values in either the hexadecimal field or the ASCII field. You can use the [Insert] key to toggle between insert and overtype mode, and the [Delete] key to delete a byte (scrolling the rest of the sector up).
Changes to the sector contents will be highlighted in red. It's important
you realize that these changes are NOT committed to disk until you select
"Sector-->Save" or "Sector-->Save as". If you just move to another sector
or another disk, all changes are discarded.
VDM99 version 2 now offers database support. You can save the characteristics
of your disks, and of the files they contain, into a database in MS Acess
format, which you can then browse or search with a sophisticated system
of queries. By default, VDM99 comes with a database called "Floppies.mdb",
which contains only one scanned disk (the VDM99 disk) and a handfull of
commonly used queries. This database is opened by default upon startup,
but you can change this if you want.
The database is represented by a file cabinet icon in the Tree View, with an open drawer if the database is open. The name of the database file is displayed near the icon, in either long or abbreviated form, depending on the settings of "View-->Full path name". To obtain more info on the database, right-click on the icon and select "Database properties". You could also select "Copy path" to copy the name of the database file to the clipboard (this works for folders and drives, too).
There are two sub-folders under the database icon: one to store saved queries, one for user-defined parameters. When you create queries (or load them from their folder), they'll be installed in the tree too.
To add a disk to your database
First mount it, then drag-and-drop it onto the file cabinet icon in
the Tree View. The disk and all its files will be registered into the database.
VDM99 detects potential duplicates, disks or files, and may prompt you
on what to do in such cases. See below
for details. After a disk or a file is entered into the database, you are
given the option to ammend the associated information. Most fields are
read-only, as they depend on intrisic charateristics of the disk/file,
but you can edit the disk location, and there are 3 information fields
for you to use as you like.
To browse your database
Select Database-->Browse-->All disks to browse disk records, or Database-->Browse-->All
files to browse file records. The relevant information is displayed using
the same dialog boxes as when the disk was scanned in. You just get an
extra set of buttons that let you navigate between records. Note that,
per database design rules, any change you make is committed to the database
when you move from a record to the next.
To search your database
You can search disks or files by issuing queries. A query is an SQL
"SELECT" statement that serves several purposes:
1) It selects a subset of records, based on the criteria you specified.
In general, these will be checking the contents of one or more fields in
the record (e.g. [File name] = "HANGMAN" ).
2) It can sort the records in ascending (alphabetical) or descending
(reverse alphabetical) order, based on the contents of one or more fields
of your choosing.
3) It can limit the number of results to the top 10, 20, etc matches
(you decide how many).
4) Finally, VDM99 displays the query results in the List View, and
allows a query to customize the layout of the list. For disk queries, you
can also mount a disk by selecting its record in the List View and doing
"Database-->Mount disk".
The "Floppies.mdb" database comes preloaded with a handful of common queries. These can be found in the "Saved queries" folder, in the database subtree. To use one of these queries, just double-click on it and it will be mounted into the tree. Alternatively, you could select one or more queries in the "Saved queries" folder and do "Database-->Load query" to load it/them into the tree. To run a query, just select it in the tree. To repeat a query, click onto another tree item, then back onto the desired query.
You can also create your own queries with "Database-->New query" or, if you know the database language SQL with "Database-->SQL query". These queries can then modified later with "Database-->Edit query" or by right clicking on a query in the tree and selecting "Edit" from the context menu. See below for details.
Queries can be saved into the database with the command "Database-->Save query", or by right-clicking on a query and selecting "Save".
Queries can be removed from the tree with "Database-->Delete query"
or by right-clicking on a query and selecting "Delete".
Queries can be removed from the "Saved queries" folder by selecting
them in the List View, and doing "Database-->Remove query" (this is the
same menu item as "Delete query", it just changes name depending whether
the Tree View or the List View has the focus). You will only be asked for
confirmation if more than one query is to be removed.
Queries present in the tree when you save your workspace will be saved
in the workspace file, and reloaded next time you load it.
If you run a query that contains an undefined parameter, VDM99 will prompt you for it each time you run the query. This is a handy way to customize queries. For instance, this is how the "File by name" query works.
Combining queries
You can mount a query on top of another, which means the new query
(the child) will only search records returned by the first one (the parent).
Various types of combination are available, depending on the query types
(file-on-disk, disk-on-file, or same-on-same).
Updating disk records
If you modified a disk, you can rescan it to ammend its record inside
the database. Just mount the disk and select "Database-->Rescan". You will
be asked for the disk ID (which you should have written on the disk label
when adding the disk to your database) and this record will be ammended.
Bulk replace
You can ammend multiple records in the database with "Database-->Bulk
update". You choose the field to modify, specify the new value it should
take, and (most importantly) specify selection criteria to determine which
records should be modified.
Exporting and merging
You can export your database, or selected parts of it, into a text
file. This file can then be opened with a text editor (a good way to print
out a list of the floppies you own), imported into Excel, or merged back
into the database (a way to make partial backups, or combine a friend's
database with yours).
The main menu bar contains the following entries:
- Drive. This menu regroups operations dealing
with virtual (or real) drives: selecting or creating a disk-image file
on your PC, connecting to the remote TI-99/4A or to Bug99, creating folders
to arrange your collection of disks, etc.
- Disk. This menu regroups all disk-related
operations.
- File. This menu regroups file operations,
including import/export and conversions between TI files and PC files.
- Sector. This menu is only available in
advanced mode and handles sector-related operations: navigating, read and
write, copy, compare, etc.
- Edit. Aside from the usual copy/paste functions,
this menu also contains the search and replace operations available in
advanced mode.
- View. Offers you a few display-related options,
including toggling advanced mode on/off.
- Setup. Here you can set, load or
save your favorite options, including currently mounted drives so you won't
have to mount them every time.
- Help. Windows does not allow WinHelp to
run any more. But help is available in the form of the current html file.
![]()
- New PC file
- Mount PC file
- Dummy folder
- Protect file
- Delete file
- Export file
- Import file
- Select sector
- Clear selection
- Swap target
- Previous track/cluster
- Previous sector
- Save sector
- Next sector
- Next track/cluster
- Stay in file (toggle button)
- Mark sectors
- Find
- Find again
- Find all
- Edit copy
- Edit paste
You can toggle display of the toolbar on/off in the View menu.
![]()
- Help info on the current menu item
- Name of the target disk, if any.
- Name of the active file (the one highlighted in the Sector Map).
If the current sector is part of the active file, its offset is shown in
[brackets] after the file name.
- Current sector number (decimal). If the Sector Editor has the focus,
the position of the cursor is shown (in hexadecimal) after the sector number.
- Caps-lock indicator.
- Num-lock indicator.
- Ins/Ovr indicator. Shows whether Insert or Overtype mode is selected
in the Sector Map and Sector Editor. Toggle it with the <Insert> key.
This menu is divided into 5 sections: The first one deals with virtual
drives consisting in PC files that contain a TI disk image.
The second part deals with ad-hoc folders, which you can use to organise
your disk in the PC sub-tree, or the IDEAL collection in the Bug99 sub-tree.
The third part handles the remote TI-99/4A and the Bug99 emulation.
The fourth part consists in a list of recently mounted drives (i.e.
disk image files residing on your PC). You can quickly mount a drive again
by selecting if from the list. To remove a drive from the list, select
it twice: the second time will cause an error (as the file is already in
use) and the offending entry will be removed from the most-recenly-used
list.
The last part contains only the Exit command, which can automatically
save your options, layout, and list of drives, if you so wish (this is
enabled in "Setup-->Options"). If you quit the program by just closing
the main window, nothing is saved.
New PC file
Mount PC file
Mount PC Folder
Drive properties
Dismount
Dummy folder
Alpha sort
Scan remote TI-99/4A
Refresh
Unhook TI-99/4A
Scan Bug99
Exit
Note that the disk icon reflects the format of the file: a 5-inch floppy represent DOAD format (sector only), whereas a 3-5-inch floppy is used for PC99 formats.
The dialog box that allows you to pick a file is a bit different from
the standard Windows file selection dialog. Since it is used by several
commands in VDM99, I'll spend a little while detailing its contents.
At the top of the box is the current directory. You cannot type anything in this combo box, but you can select a different drive or one of the parent folders in the drop list. The two small buttons nearby respectively serve to travel the list of previously visited folders, and to move one level up to the parent folder. (To move one level down, simple double-click on a folder in the list).
The file list displays the filename, optionally followed with information
related to the TI-99/4A, if relevant:
Format. This is the format of the PC file. It may be a disk format
(DOAD or PC99), or a file format (FIAD or TIFILES). Or it may be blank
if the file content dosen't seem to match any known TI format.
TI name. This is the name of the TI disk (for disk image files), or
the name of the TI file (for exported files).
Type. For disks, this field indicates the number of sides (SS: single-side,
DS: double-side) and the density (SD: single-density DD: double-density).
For files, it is the file format (e.g. Prog, DF80, IV254, etc).
Size. Is the size of the disk image in sectors, or the number of sectors
in the file (not counting the FDR).
There are three ways you can filter the list of files:
1) Pick one of the options in the drop-list of the "Files of type"
combo. This basically filters files based on their extension. To turn this
feature off, select "All files (*.*)".
2) Type a filename containing a wildcard character (? or *) in the
"File name" combo and hit the <return> key (or click the default button
or a checkbox). This filters files based on their name.
3) Select/deselect the three checkboxes that filter the files by contents:
TI disk filters in files that appear to contain TI disk images
in DOAD or PC99 format. Note that detection of DOAD files is based on the
contents of sector 0 and may not work if the imaged disk is not or improperly
formated.
TI file filters in files that contain an exported TI file with
a FIAD or TIFILES header. Files exported without a header (e.g. to a *.txt
file) cannot be detected with this option.
Other filters in files that have failed the above two detection
schemes. These may be TI files exported without a header, or unrelated
PC files.
To select a file, click on it in the file list. Alternatively, you can
enter a file name in the "File name" combo, or select a previously selected
file from the drop-list (this may result in changing the current folder).
If the command allows for multiple file selections, hold the Ctrl or
Shift key down while clicking in the list. Alternatively, type several
file names, each enclosed in double-quotes, in the "File name" combo ("File1.dsk"
"File2.dsk").
Mount folder too. When mounting a disk, an extra checkbox labelled
"Mount folder too" appears above the [Mount] button. If you check this
box, the PC folder will appear in the tree view, with the selected file(s)
as children. If you wish to only mount the folder, leave the filename empty.
Format: You have the choice between DOAD (simple sector dump) and PC99 (includes track info). Additionally, you could select "CF format", which is the 1600-sector format used by the NanoPEB. When you close the drop-list, "CF format" will reverse to DOAD, but place the proper size (400 KB) in the "Size in bytes" field. VDM99 version 2.3 has been modified to handle 1600 sectors, rather than 1440 as in version 2.2.
DD: double-density. This is critical for PC99 format, which differs according to the number of sides and density.
DS: double-sided. Ditto.
Name: Enter the file name and path. If you don't use a path, the file will be created in the current folder. I'd suggest you use a meaningful extension, such as "dsk" or "pc99".
[Browse]: Calls the file dialog box and lets you select a folder and a filename for the drive. If you pick a file that already exists, you will be asked if it is ok to overwrite it.
The next 3 fields are used by Bug99, which can place several disks in
a single file (e.g. to emulate the Ramdisk memory). You can just ignore
them, but if you are curious, here's what they mean:
Start: Offset (in bytes) at which the disk image starts in the
file.
Size in bytes: Current size of the file or (for Bug99 disks)
size of the disk within the file.
Max size: Maximum size a Bug99 disk can have inside a file,
not to overwrite the next disk.
Once you dismiss the dialog with [OK], the disk-image file is created. You are then presented with the "Disk format" dialog, which will be described below. It allows you to properly initialize the TI disk. Note that the DS and DD boxes are preset to the values you selected when creating the drive. You may change these, but it will not change the type of PC99 format. It just means that the TI disk will misreport its characteristics, which is generally not a good thing...
The newly created drive will appear in the PC sub-tree, either at the root, or in the folder that had the focus when you selected the command (if any). Note however, that you can only mount a drive (or folder) into a yellow folder if it is actually part of that folder on the PC. If is isn't, it will be mounted at the PC root. Blue folders do not suffer from such restrictions.
You can change the name of a drive or folder by clicking on it twice,
not too quickly. This only affects the display in the tree and won't change
the actual file name. For PC folders, you have the option of toggling between
your name (by default the folder name) and the full path name by selected
the proper option in the View menu.
This command allows you to mount a PC folder and all the disk image
files it may contain. All you need to to is to select the desired folder
from the Folder selection dialog, VDM99 mounts it in the file tree as a
child of the current folder if allowed, or at the root of the PC sub-tree.
It then searches the folder for all files that may contain disk images
(in DOAD or PC99 format) and mounts then as children of the selected folder.
Dummy folders are created with the name "Dummy folder". You'll probably
want to change it, by clicking twice on the folder (slowly) and typing
in a new name.
For instance, you could have a series of dummy folder called "A-H",
"H-N", "N-U", and "U-" to automatically dispatch your disks in alphabetical
dividers. A couple of things to note, though:
Since the disk name must be smaller than the Last string, Last
must appear again as First in the next folder. In the above example,
if you had dummy folders named "A-G"and "H-N" any disk beginning with G
would not be sorted and would remain in the parent folder.
You can omit the Last string to include any disk with a name
greater or equal to First, as in the "U-" example above.
Conversely, you could use "-A" to accept any disk that begins with
a character smaller than 'A'.
Finally, the contents of the recipient folders are not sorted aphabetically.
If you want to do this, you will need to click on the desired folder and
select "Alpha-sort" again.
There are several prerequisites for this to work:
- The TI-99/4A must be connected to you PC with one of the cables described
later
in this document. This could be a parallel cable, or one of two different
types of serial cables: crossed or straight-through.
- The communication parameters for the PC should be set properly in
the "Setup-->Options" dialog, "Remote" tab. This involves selecting the
proper PC port, type of cable, and communication protocol. See below
for explanations (the good news is, you only need to do this once if you
save your options, as these are loaded automatically when VWM99 starts).
- The TI-99/4A must be running the proper assembly routine to enslave
it to the PC. There are 6 such routines, corresponding to the 6 possible
TI-99/4A ports (2 parallel, 4 serial). In addition, each routine comes
in the form of a "program" file (Editor-Assembler option 5) and a DF80
object file (E-A option 3). See below for help
on selecting the proper routine, and on transfering it on the TI-99/4A
for the very first time.
You can either list all drives together, or arrange them according the
the peripheral card that supports the drives (listed according to its CRU).
Use "View-->Devices" menu to toggle this option.
However, it can become a problem in two situations: first when a write operation is not properly executed on the remote system, due to a faulty drive or disk for instance. Since you're reading back from the PC buffer, you will not see the problem. Second, if you change floppies in one of the remote drives, VDM99 will not be aware of it, as it keeps accessing the local copy.
The "Refresh" (aka "Flush buffers" in VDM99 1.0) command solves these problems by causing VDM99 to "forget" that it has read any sector in the currently selected disk. It will thus start afresh and read each sector from the remote system again (but just once for each sector). You should select this command each time you swap disks in a remote TI-99/4A drive, and when you suspect a write operation may not have been properly carried out.
Alternatively, if you don't like this buffering scheme, you can disable
it in "Setup-->Options".
If you decide to re-establish the connection, just relaunch the routine
on the TI-99/4A and select "Drive-->Scan remote TI-99/4A" on the PC.
Here also, you have the option to display all drives together, or to arrange them by device. If you are using my IDEAL DSRs, your collection of virtual floppies will also appear, in a folder named "Floppies".
Note: If two devices should contain a drive with the same name (e.g. "DSK1") a real TI-99/4A can only access the drive located in the device with the lowest CRU address. Bug99 however remembers which drive is on which device and lets you access both drives independently.
In "Setup-->Options" you can decide whether to always save your workspace
when exiting, never to do so, or have VDM99 ask you what to do. In any
case, you can always exit without saving by closing the VMD99 window, rather
than selecting "Drive-->Exit".
This menu regroups most operations dealing with a TI-99/4A disk.
Most of them, but not all, require a current disk to be selected, which
you can do by simply clicking on a disk/drive in the tree pane.
Disk properties
Diagnose
Defragment
Copy disk
Format disk
Purge disk
Sort files
Name: The TI disk name (max 10 chars).
Files: The number of files in the directory. This information is obtained by counting pointers in sector 1 and cannot be edited via this dialog (use "File-->Delete" and "File-->Create").
Double-sided: This box is ticked if the disk claims to be double-sided (i.e. 80 tracks).
Double-density: This box is ticked if the disk claims to be double-density (18 sectors per track).
Protected: This box is ticked if the disk is "copy-protected", according to TI original scheme, which is just to include the letter 'P' after the format name. Most disk managers completely ignore this and copy the disk anyway. So does WVM99.
Sectors: The number of sectors on disk, as reported in sector 0.
Free: The number of remaining free sectors. This is calculated by scanning the sector bitmap found in sector 0, and cannot be modified via this dialog (use "Sector-->Mark" in advanced mode).
[Size]: Clicking this button adjusts the total number of sectors according to the density and number of sides. It will be 360 for SS/SD, 720 for SS/DD and DS/SD, and 1440 for DS/DD.
Time stamps: If you are using my IDEAL DSRs, a time stamp can be added in sector 0, to indicate when the disk was created and when it was last modify. Dates should be entered in the format dd/mm/yy and time should be entered as hh:mm:ss (note that seconds are rounded up to the next 2-second interval). In addition, you could type "today" or "now" in a date field to specify the current date, or type "now" into a time field for the current time.
Tracks per side: This is normally 40, but the TI format allows for different values (most likely 35).
Sectors per track: Normally, single-density disks have 9 sectors per track, whereas double-density disks have 18.
Format name: This should be "DSK" to indicate native TI format.
Plato protection: Plato disks hide their file list in sector
359, instead of sector 1. By checking this box, you instruct VDM99
to consider the disk as "Plato" protected, and to use sector 359 to read
or update the file catalog.
Possible diagnostic messages:
"Size is too big for sides & density" indicates a mismatch between
the number of sectors reported in sector 0, and the number of sides and
density also reported in sector 0.
"File list is not in alphabetical order" (info taken from sector 1).
"Illegal FDR number found in file list": one of the pointers in sector
1 points to a sector greater than the total number of sectors, or smaller
than 2.
"Illegal sector number found in FDR": a file claims to be using a sector
that's either beyond the total number of sectors, or smaller than 2.
"# sectors marked as used but not used", where # is the number of
sectors marked as used in sector 0 bitmap, but not used by any file. May
be bad sectors, or contain hidden info...
"# sectors marked as free but used by file(s)", conversely, # is the
number of sectors marked as available, but actually used by a file/FDR.
Very dangerous as a write operation may overwrite these sectors...
"# sectors beyond disk size marked as free": by convention ALL sectors
beyond the number reported in sector 0 must by marked as used, to prevent
the DSRs from allocating them to a new file.
"# sectors beyond disk size used by file(s)": one or more FDR claims
to be using a sector that is past the total number of sectors reported
in sector 0.
"# sectors used by more than one file", where # is the number of sectors
that are shared by two or more files. Might be some fancy data-sharing
or protection scheme, or a disk problem.
"No problems found": This is the message you want!
Defragmenting a disk means that all files will be rewritten and arranged
in alphabetical order at the beginning of the disk (from sector 2 on).
Each file will consist of a single cluster, immediately following its FDR.
Note that, if you place a never-formatted-before disk in a remote drive,
selecting this drive will cause an I/O error when VDM99 attempts to retrieve
the disk catalog. This is normal and will not prevent formatting, so just
dismiss the error message, and proceed with formatting. Alternatively,
you may want to right-click on the drive icon and select "Format..." from
the context menu. Since right-clicking does not display the catalog, no
error will occur.
This menu regroups most file operations. All of them require a disk
to be selected (by clicking on it in the disk tree), and some also require
one or more file to be selected in the file list. Click on a file to select
it, use Ctrt-click or Shift-click to select more than one.
Create file
File properties
Rename
Protect/Unprotect
Purge file
Delete file
Undelete
View file
Export file
Import file
Name: The TI file name. Max 10 characters.
FDR: The number of the sector that contains the FDR. This value cannot be modified.
Type: The file type, e.g. "Prog", "DV80", etc. If you modify this, you better know what you are doing, otherwise you'll just make the file unusable!
Sectors: The total number of sectors in the file, not counting the FDR (contrarily to the file list). This number is thus 1 less than what appears in the file view (e.g. an empty file has a size of 0).
Clusters: The number of clusters into which the above sectors are split. This value cannot be modified (use "Disk-->Defragment" to make every file a single cluster).
Records: This field varies depending on the file type. For "fixed" files, it indicates the number of records, for "variable" files it just repeats the number of sectors, for "program" files it is always 0.
Records per sector: For "fixed" files, this is the number of records per sector, for "variable" files it is the minimum number of records be sector (there could be more if records are smaller than the maximum size), for "program" files it should be 0.
Last byte: Indicates the number of bytes used in the last sector of a "program" or "variable" file. Always 0 for "fixed" files.
Time stamps: Just like disks, each file can be time-stramped if you are using my IDEAL DSRs. There is one stamp for the creation date+time, and one for the last time the file was modified. Date format is dd/mm/yy and you can use "today" or "now" to enter the current date. Time format is "hh:mm:ss" and you can use "now" to specify the current time (when [OK] is clicked).
[Sector list] This displays a sub-dialog box containing a list
of all sectors used by the file. You can edit this list if you want, but
make sure you know what you're doing...
[Get free sector] This gets the number of the next free sector from the bitmap in sector 0, and appends it to the list as a single-sector cluster. You are free to repeat the operation as long as there are free sectors, and to merge adjacent sectors into clusters.
[Mark all used] Marks all the above-listed sectors as "used" in sector 0 bitmap.
[Mark all free] Marks all the listed sectors as "free" in sector 0 bitmap (quite dangerous to do, as your file becomes highly likely to be overwritten).
[Ok] Dismisses the sector list dialog, and introduces any changes you made into the FDR and sector 0 as appropriate. Note that modifications to the FDR won't become effective until you also dismiss the "File Properties" dialog with [OK]. By contast, any changes to the sector bitmap in sector 0 (introduced by [Get free sector], [Mark all free], or [Mark all used]) become effective now, and won't be cancelled even if you dismiss "File Properties" with [Cancel].
[Cancel] Discard all changes you made to the sector list. The
file FDR remains unchanged. Any sector you might have appropriated with
[Get free sector] will not be marked as used. Similarly, the effect of
[Mark all free] and [Mark all used] is cancelled.
File-->View-->As text exports the selected file into a temporary text file, using the conversion options you set for file export in "Setup-->Options". Then it instructs Windows to open the file using the default application that handles files with a .txt extension (if you haven't selected one, Windows will ask you for instructions).
File-->View-->Hexadecimal is best used for files that do not
contain text. It exports an hexadecimal + ASCII dump into a temporary text
file and again asks Windows to open it in your default text editor (e.g.
Notepad, Wordpad, etc). The listing is equivalent to that of the Sector
Editor, but comprises all the sectors in the file (not including the FDR).
You will notice that a new combo box has appeared above the [Export]
button. You can use it to include a 80-byte header at the top of the PC
file, which will contain info on the nature of the exported TI file.
Add FIAD header: Adds the "file-in-a-directory" header introduced
by V9T9, before the first data byte. A FIAD header simply reproduces the
FDR, not including the cluster list.
Add TIFILES header: Adds a different type of header, which also
reproduces the information found in the FDR, but in a somewhat scrambled
order. Note the file produced does NOT contain the "junk" bytes found at
the end of each sector.
No header: Saves the file as such, in pure binary copy. I'd
suggest you use a filename or extension reflecting the file type, in case
you want to import it back later (e.g. "MyFile_DF80.bin" or "MyFile.DF80").
Convert to text: Is mostly useful for DV80 files created with
a text editor. It appends the proper "end-of-line" sequence (>0D >0A) at
the end of each record, so that they can be read with a text editor on
the PC.
Convert to text + tabs: Does the same, but converts stretches
of spaces to tab characters when possible. Use "Setup-->Options" to specify
the position of the various tab stops.
Once you confirm your selection with [OK], you will be presented with a confirmation dialog box for each of the files you've picked. You can decide on the name the file should have on the TI disk, and on its type. If the file comprises a header, the information it contains is used to preset the dialog, but you are free to modify them.
Convert text: This options is useful in case you've selected a .TXT file on your PC. It causes VDM99 to search for PC-style end-of-lines, strip them, and terminate the record there if possible (for "variable" files), otherwise fill the rest with spaces (for "fixed" files).
Convert tabs: If you select this option, any tab character found in the PC file will be replaced with spaces according to the specifications you made in "Setup-->Options". Basically, you can either replace a tab with a fixed number of spaces (including none, to just remove the tabs), or issue enough spaces to reach a given column position, known as a tab stop. See Setup-->Options for more details.
Truncate overlong lines: if you tick this box, text lines that are too long to fit in the record size you have selected will be truncated. If this box is not checked, long lines will be split into the next record. This option is useful when importing assembly programs, as you don't want overlong comments to continue on the next line where they'll cause a syntax error.
There are a couple of "secret" file types, both relating to Jean-Francois Rossel's cross-assembler package:
This menu regroups command dealing with the Sector Map and Sector
Editor views. Consequently, these commands are only available in advanced
mode (select it with "View-->Advanced").
Next sector
Previous sector
Next track/cluster
Previous track/cluster
Stay in file
Read sector
Save sector
Save sector as
Compare sectors
Copy sectors
Swap target
Mark sectors
When "Stay in file" is selected, this command moves to the next sector
within the file, in order of appearance.
When "Stay in file" is on, it moves to the previous sector in the file
or, if the current sector was the first one, to the file FDR.
When "Stay in file" is on, the command moves to the start of the next
cluster or, if you were in the last cluster, to the end of the file. A
cluster is a group of adjacent, and consecutively used sectors in a file.
They are listed in the file FDR.
When "Stay in file" is on, the command moves to the end of the previous
cluster in the file or, if you are in the first cluster, to the file FDR.
When "Stay in file" is on, all navigation commands are restricted to
sectors within the file, and so are search-and-replace operations.
To copy the sector to a different disk, you must have previously defined a target disk. This is easily done by dragging-and-dropping a disk from the Tree view into either the Sector Map or the Sector Editor. Alternatively, you could use the "Edit-->Select disk as target" command, to make the current disk the target one. The name of the target disk appears in the status bar in the form "To diskname". If you haven't selected a target, the status bar displays "No target disk".
When a target disk has been defined, it will be selected by default
in the "Save as" dialog, but you always have the option to use the current
disk by selecting "This disk" from the drop list.
When the command is triggered, a dialog box appears that lets you select the source and target for the comparison.
Source: The source is always the current disk.
Sectors: First sector to compare. This field is initialized as the current sector.
To: Last sector to compare. If you leave this field empty, only one sector will be compared.
Destination: This can be either the current disk, or the target disk if one has been defined (by dragging-and-dropping a disk/drive from the Tree view into the Sector Map or Sector Editor).
Sectors: The first sector to use for comparison. This field is initialized as the current sector.
To: The last sector to compare. If left empty, the same number of sectors specified for the source will be used for the destination.
Click [OK] to launch the comparison. Any sector in the source that doesn't
exactly match the corresponding sector in the target will be highlighted
in red in the Sector Map. The first sector (in the source) that contains
mismatches will be displayed in the Sector Editor, with all differences
highlighted in red. You can view other compared sectors by navigating the
map, and any differences will also be highlighted in the Sector Editor.
You can use "Swap target" to move from source to destination and conversely.
This command allows you to copy one or more sectors to a different
place in the same disk, or to a different disk.
The same dialog box as for "Sector-->Compare" is used to select the source and destination. The only difference is that there is an extra check box labelled "Mark as used". Checking this box results in marking copied sectors as used in the directory of the target disk.
You do not need to have the same number of sectors in the source and the destination. The rule is that the destination is always filled to completion, but never further. So if the source is larger than the destination, copying stops when the last sector in the destination (the one specified in the "To" field) has been copied. If the destination is larger than the source, copying continues from the beginning of the source again (e.g. copying sectors 1-3 into 10-17 copies sectors 1, 2, 3, 1, 2, 3, 1 ,2 into sectors 10, 11, 12, 13, 14, 15, 16, 17).
The copy operation is buffered, so there are no problems when source
and destination overlap. For instance, if there were no buffering, copying
sector 1-3 into 2-4 would result in copying sector 1 everywhere since,
when its time to copy sector 2 it has been overwritten with a copy of sector
1. So VDM99 first read all sectors to copy into a temporary buffer, then
performs the copy operation using this buffer as data source. (If you really
meant to make multiple copies of sector 1, just copy 1-1 into 2-4).
If you have previously run the "Sector-->Compare" command, "Swap target" swaps the two compared areas and runs the comparison again. If the comparison did involve a target disk, the command also swaps disks just as above. But if the comparison was internal to the current disk, no disk swapping occurs. Simply, the highlighting of mismatched sectors in the Sector Map swaps between source and destination areas.
If the current sector is part of the "source" compared area, the Sector
Editor will jump to the corresponding sector in the "destination" area.
This allows you to quicly toggle between sectors to inspect the mismatched
bytes. If the current sector is outside the comparison area, it remains
the current sector.
Sector: First sector to mark.
To: Last sector to mark (inclusive).
[Free]: Mark sectors as free.
[Used]: Mark sectors as used.
[Cancel]: Do nothing.
To mark more complex groups of sectors, e.g. non-adjacent ones, you could use "Edit-->Edit selection" to enter a list of sectors, and then click [Mark all used] or [Mark all free]. You can do the same in "File-->Properties" by clicking on [Sector list]: it displays the same dialog, only preset with a list of sectors used by the file.
N.B. The menu called by right clicking on a sector features two distinct
entries: "Mark used" and "Mark free". They only affect the clicked
sector, after which the selection is moved to the next sector.
If the active pane is the Tree view: nothing is copied to the clipboard,
the current disk/drive is memorized.
If the active pane is the File view: the disk catalog is copied to
the clipboard. The list of currently selected files (if any) is memorized
internally.
If the active pane is the Sector Map: the map is copied to the clipboard.
If the active pane is the Sector Editor: the editor's display is copied
to the clipboard. The current disk and sector number are memorized.
If the active pane is the Tree view: Pasting a list of files (memorize with Edit-->Copy in the File view) into a disk/drive copies these files there. Pasting a disk/drive (memorized with Edit-->Copy in the Tree view), copies this disk onto the current one. Pasting a sector (memorized with Edit-->Copy in the Sector Editor) places this sector into the Sector Editor, from which it can be committed to disk by selecting "Sector-->Save".
If the active pane is the File view: pasting a list of files copies them to the current disk.
If the active pane is the Sector Map: Pasting a memorized disk/drive makes it the current target. Pasting a file (or a list of files) highlights them in red and makes the last one the current file. Pasting a memorized sector copies it into the Editor pane, from where it can be saved to disk if desired.
If the active pane is the Sector Editor: Pasting a memorized disk/drive
makes it the current target. Pasting a memorized sector copies it into
the Editor, without committing it to disk yet..
You can also use Ctrl-C and Ctrl-V to cut and paste the sector list,
or parts of it. For instance, supposed you are trying to reconstitute a
DV80 file that was accidentally wiped out. You would search for sectors
that could be in DV80 format, call "Edit-->Selection", copy the sector
list with Ctrl-V (optionally editing it first), call File-->Properties
and [Sector list] inside of it, and now paste in the list of sectord so
they become part of the file.
Find what: If you want to search for a string, type it here. You can search for text or hexadecimal bytes, and you can use a wildcard, if you wish.
Type: Decides whether the string you entered is ASCII text or a list of bytes in hexadecimal notation. If you change the type from ASCII to Hex, any text you might have typed in "Find what" will be converted to hexadecimal bytes. Conversely, if you change the type from Hex to ASCII, an attempt is made to convert hexadecimal bytes to text. Be aware that conversion may not work well if the list of bytes contains unprintable characters. For instance, a >00 byte will cause Windows to truncate the string.
Wildcard: Leave this empty if you do not wish to use a wildcard. Otherwise, enter the character (or hexadecimal byte) to use as a wildcard. The type of wildcard (Hex or ASCII) is always the same as that of the query string. If the query string contains characters matching the wildcard, these will not be considered during the search. For instance, if you defined * as the wildcard, searching for "C*T" will match CAT, CUT, COT, etc.
Replace with: If, and only if, you have selected a query string in "Find what", you have the option to enter a replacement string. When a match to the query is found, it can then be replaced with the replacement string. Note that the entire replacement string is copied, even if its longer than the query string. (The only exception is when the replacement reaches the end of the sector: it will only continue to the next sector if the "Cross boundaries" box has been ticked). So replacing "dog" with "mongrel" will change "My dog is black" to "My mongrelblack". The opposite operation would convert "My mongrel is black" to My doggrel is black". So it's generally best if query and replacement have the same length...
Type: Just like query, the replacement string can be ASCII or hexadecimal.
Wildcard: You can define a wildcard for replacement purposes
(which doesn't need to be the same as the query wildcard). Any character
in the replacement string that matches the wildcard will be left unchanged.
This is mostly useful when a wildcard in the replacement string matches
a wildcard in the search string, or when the replacement string is longer
than the query. For instance, searching for "C*T" and replacing it with
"B*T" changes CAT into BAT, CUT into BUT, etc.
The fields in the "Where" box allow you to restrict the search to some sectors or, if you left the "Find what" field empty, to search for a given type of sector.
Sector: The first sector to include in the search. Initialized as 0.
To: The last sector to search (inclusive). By default, this field is initialized as the last sector in the disk, based on the disk size reported in sector 0.
Cross boundaries: This allows you to search for a string that may begin at the end of a sector and continue in the next one. Mostly useful when searching inside a "program" file.
Inside filename: If a current file has been selected, its name appears here. Ticking the box restricts the search to sectors that are part of this file, including its FDR. This box is initialized to the current value of the "Stay in file" option. If you change it, it will modify the "Stay in file" option accordingly, when the search begins.
Marked free: Include sectors that are marked free in sector 0 bitmap.
Marked used: Include sectors that are marked used.
In FDR: Include sectors that are listed as FDRs in sector 1.
In files: Include sectors that are listed as being part of a file in one of the FDRs found in sector 1.
Not used: Include sectors that are neither a FDR, nor part of a file. (Note: sector 0 and 1 are considered as being part of a file).
Sector format: Here you can type a record format, to restrict the search to sectors that could match this format. For instance, you could search for DV80 sectors, or IF254, etc. Note that, because "program" and "display/fixed" sectors can contain absolutely anything, every sector will always match these types. You can also enter "Any" to disable this option.
[All]: Initializes all the contents of the "Where" box so that
all sectors are searched, no matter what.
Once you have filled all the fields you wanted, you are ready to begin the search. Click one of the following buttons:
[Find next]: Finds the next sector matching your requirements (if any) and containing at least one occurence of the query string (if any). This sector will be highlighted in red in the Sector Map, and displayed in the Sector Editor, with the matched string in red. If the sector contains several matches to the query string, the first one is highlighted.
[Find all]: Finds all matching sectors, and highlight them in the Sector Map. The last sector found becomes the current one and is displayed in the Sector Editor.
[Replace]: Find the first match, displays it in the Sector Editor and replaces it with the replacement string (if any). The replaced text is shown in red. At this point, the change is not commited to disk, until you select "Sector-->Save".
[Replace all]: Find all matches, highlight the corresponding
sectors in the Sector Map, replaces every occurence of the query string
with the replacement string, and save these sectors to disk.
Advanced mode
Toolbar
Status bar
Devices
Full path names
Customize list
Calls a dialog box that lets you customize the layout of the list
appearing in the right pane. This pane can display several types of information,
depending on the item that is currently selected in the tree view:
- Current disk catalog
- Results of a disk query
- Results of a file query
- Results of a SQL query
- List of saved queries
- List of user-defined parameters
When you call "Customize list", the dialog will apply to whatever type is currently displayed. To customize another type, you must first display it.
The dialog box contains the following controls:
Apply to: This lets you decide whether you wish to customize
the current tree item only, or change the defaults for all such items that
have not been customized. Possible settings are:
- Current view (or current query): applies to the disk/drive or query
that is currently selected in the tree view. This is not available for
the lists of queries, as there is only one so the default always applies.
The same is true for the parameter list. If you leave this empty, the default
layout will be used when displaying this item.
- The default layout for such items, when they have not been customized.
This is not available for SQL queries, as the default is "display all fields
returned by the query".
- Default column sizes and justification, to be used when such information
is ommited in one of the above two option.
The big text box serves to enter a list of information fields to be
displayed, optionally followed with formatting options. You can type text
directly into the box, the syntax is very simple:
[field name] <size justification> where size is
the column width in pixels, and justification can be left, center
or right.
Alternatively, you the controls above to avoid syntax errors. Just select a field from the drop-down list, optionally enter a column with and/or justification, and click the [Add] button.
Columns in the list view will be created to display the fields you selected, in order of appearance, using the width and justification you provided (if any). Note that you can always resize columns directly in the list view, by dragging their separators. The new size is remembered for the current node and will be reused the next time you display it.
Things are a bit different when you edit the default column characteristics. Here, you get a list of all available fieds, each followed with a default column width and justification. These values will be used of you ommit column specification when customizing an item or changing the default layout. You can change these default values, but make sure that all fields are always present.
[Get current] This button retrieves the current layout for the category selected in "Apply to". In the case of the current view, the values returned are taken from the display. The column width can differ from what you set when customizing this node, since you may have resized a column directly in the list view. When the dialog first appears, it shows you whatever customization you previously entered. Clicking [Get current] changes it to current values.
[Save] This button saves the current layout without dismissing the dialog box. This allows you to edit several categories without having to leave the dialog box.
[OK] Dismisses the dialog, saves your changes and apply them to the display. Layout information is saved in your workspace, together with each item that's present in the tree when the workspace is saved. Queries saved in the database include customized layout. Default layout and column formats are saved into the database, except for the disk catalog, which saves this info in the workspace.
[Cancel] dismisses the dialog box without commiting your most
recent changes. Of course, if you previously clicked [Save], the saved
changes remain in effect.
As a reminder, if you replace VDM99.EXE with version 1.9x, database support is unavailable, and the Database menu contains only one item that reads "Database disabled".
New database
Open database
Close database
Export database
Merge database
Browse
Add disk
Rescan disk
Mount disk
Remove disk
New query
Edit query
Save query
Load query
Delete query
SQL query
New parameter
Delete parameter
Bulk update
Advanced database functions
Using parameters
Combining queries
In the file selection dialog, just enter a filename with an .MDB extension and click [Open]. If the file already exists, you will be asked for confirmation, as the command will wipe out anything that was in the file.
The new database becomes the current one, and will be automatically
opened upon startup if this function is selected in "Setup-->Options-->Database".
To open an existing database, use "Database-->Open" and select an exiting
.MDB file, which must contain a VDM99 database in the proper format (i.e.
with the expected tables, fields, etc). VDM99 closes the current database
and opens the one you specified. This becomes the new current database
and will be opened next time you start VDM99 (that is, assuming you saved
your workspace).
When you select "Database-->Export", you are presented with a dialog box that comprises three sections. First, you should select which record set (aka table) you'd like to save. Then pick the file name. Finally, you can define the file format.
VDM99-generated databases contain the following tables:
Disk: You have the option to save all disk records in the database,
or only those records that were returned by the most recent disk query.
Or you could elect not to save the disk table at all.
Files: Again, you could export all file entries, none, or only
those entries that were returned by the most recent file query. Additionally,
you could select "From above disks" to save only the files that are found
on the disks you chose to export. This option is recommended if you are
planning to merge the exported file with a database.
Relationship table: You must include this table if you exported
disks and files that you intend to merge later with a database.
Queries. Tick the box to export your list of saved queries.
Parameters. Tick the box to export the parameters you defined.
It's generally a good idea to export queries and parameters together, as
parameters are used by queries.
Info. Tick this box to export the default layout for the various
database-related views, and the default column widths and justifications.
Then you should enter a filename in the text box, or use the [Browse] button to select one. As a general rule, it will have a .TXT extension. If you intend to import the file into Excel, avoid .CSV extensions, as these trigger default processing in Excel that may not correspond to the format you selected.
You should then define the file format, namely select the characters (or strings of characters) to be used to separate fields, records, and tables. You can pick a character from the drop list, or select "Other" to display an extra text box in which you can type the character you want (there can be more than one). Just make sure that whatever you pick is not likely to appear in any of the database fields. For instance do not pick the comma, as some fields comprise commas that would then be mistaken for separators.
Field separator. Used to separate the various fields in a record,
e.g. Disk name, ID, Size, etc. By default, it is set as the <tab> character
and I recommend you leave it so.
Record separator. Used to separate the various records in a
table. By default, it is a PC-style line break, i.e. characters 0x0A and
0x0D.
Table separator. Used to mark the end of a table in the file.
The default is the form feed character (ASCII code 0x0C), but you can change
this to something more prominent, such as multiple line breaks, or a long
line of ---- signs. To my knowledge, Excel does not recognize any sequence
as spreadsheet separator, so if you are exporting several tables and want
each one on a different sheet, you'll have to manually copy them from one
sheet to another inside Excel. You can also leave this field empty, but
not if you intend to use the file for database merging.
If you examine the exported file with a word processor, you will notice
that each table begins with a record containing only the table name, then
a record listing all the field names, then zero or more records that list
the table contents.
Disks. Here you can decide whether to import disk records, and
what to do if a matching disk record already exists in the database. Your
options are:
- To overwrite the existing record with whatever information is imported
from the text file.
- To keep the existing record, and ignore the one found in the imported
file.
- To create a duplicate entry based on the imported file, leaving the
existing entry untouched.
- Finally, you could elect not to import disk records at all. In this
case, you will not be able to import file records either.
Files. Files records are always imported if you import disk records,
and never if you don't. You should however decide what to do if an imported
file record matches one that already exists in the database. You can choose:
- To overwrite the existing record, and replace it with the imported
data. Any disk record that used to refer to the old record will now refer
to the new one. This is equivalent to selecting [Update old] when manually
adding a disk.
- To use the existing file record in place of the imported one. This
means the existing record will be shared by existing and newly imported
disks.This is equivalent to selecting [Use old entry] when manually adding
a disk.
- To create a duplicate entry, specifically linked to the imported
disk(s) containing that file. The existing file record in the database
remains untouched and is used by disks already present in the database.
Queries. You can decide whether or not to import queries, and
what to do if a query with the same name already exists:
- Replace the existing query with the imported one.
- Keep the existing query and do not import the one found in the file.
- Or you could choose not to import queries at all.
Parameters. Just like with queries, you can elect to replace parameters that already exist in the database, to disregard imported parameters that have the same name as existing ones, or not to import parameters at all.
Info. Again, you can choose to overwrite existing information (in general, it will always exist), to keep it unchanged, or not to import the information table at all.
Then select the file you want to merge with the database, using the [Browse] button if you wish. In general, it will be a file you've previously created with "Database-->Export", but you may have created/edited the file in Excel or with a word processor. If you do so, though, be careful not to corrupt the database by entering absurd values...
As for the file format, you should again select field separator, record separator and table separator just as in the "Database-->Export" dialog box. Obviously, these values should match those used when exporting the file...
Click [OK] to perform the merge. If you are importing disks and files,
VDM99 uses the relationship table to performs several checks and make sure
database integrity is maintained. First of all, file records that are present
in the text file, but not mentioned in the relationship table will be removed.
Then if, according to the relationship table, an imported disk should contain
a given file but that file was not imported, the merge operation will be
canceled. Similarly, the merge is canceled if an imported file is listed
in the relationship table as being part of a disk that was not imported.
And of course, you cannot import disks without files, files without disks,
or either ones without the relationship table: all three tables must be
part of the imported file. You can however import a merge file that contains
only queries, or parameters, or just the info table.
In all cases, you will be presented with the same dialog boxes used
to review disk or file information when adding a disk to the database.
Two differences though:
- The list control at the bottom of the "Disk" dialog now contains
the list of all files found on this disk. In the "file" dialog, this box
lists all the disks that contain the file in question (there may be more
than one, if you elected to reuse a duplicate).
- The dialog now contains naviagtion buttons, which you can use to
browse the database. As per database design specs, any changes you made
to a record are saved into the database whenever you move to a different
record.
[Next] Moves to the next record
[Previous] Moves to the previous record
[First] Moves to the first record
[Last] Moves to the last record
[Refresh] Reloads the current record from the database, thereby
discarding any changes you might have made but not saved yet.
[Delete] Removes the current disk record from the database.
It also removes all associated file entries, provided they are not shared
by another disk. This button does not normally appear in the "File record"
dialog, as files must always be removed with their disk. However, you might
see this button with "orphan" files, i.e. files that don't have an associated
disk (this should normally never happen, unless your database got corrupted).
[OK] Saves the current record and dismisses the dialog box.
[Expand] This button double the width of the dialog box and
displays the file list in the right side. This allows to display more files
than with the original layout. To return to the original layout, click
the same button, which is now labelled [Collapse].
For files, the CRC value only considers the data portion of the file, excluding any unused bytes at the end of a sector, and not considering information in the FDR, such as file name or time stamps. This way, files with identical contents can always be spotted, even if they've been renamed. An empty file has a CRC of 00000000, whereas a value of FFFFFFFF indicates that something went wrong while scanning the file.
For disks, VDM99 calculates two CRC values. A sector-based one, CRC-S, which considers every sector marked as used in the disk directory. Since sectors 0 and 1 are always used, CRC-S is never zero. Two disks with identical CRC-S values are "clones", in that all their used sectors are identical, so they were likely copied sector-wise.
VDM99 also coins a file-based CRC, which I call CRC-F, by combining the CRCs of all files on the disk. Thus, an empty disk, or a disk containing only empty files, has a CRC-F of 00000000. Disks that have the same CRC-S generally also have the same CRC-F (unless a file is using a free sector, which should never happen). By contrast, it is quite possible for two disks to have different CRC-S but identical CRC-F. It generally means that the original disk was copied file-wise, which rearranged the files on the copy. Or it may be that the disk manager time-stamped the copy. Or the disk may have been renamed, or some of the files might have been renamed. The important point is that disks with identical CFC-F carry the same data (i.e. file contents), but arranged differently.
When you add a disk to your database, VDM99 first checks for duplicates based on CRC-S. If one or more duplicates are found, a dialog box pops up that shows the duplicate(s) and gives you the option to abort. In general you won't want duplicate entries in a database, but there are cases when they are acceptable. For instance, you might have a "real" floppy, and its disk image on your PC: they'll have the same CRC-S and CRC-F, but are distinct entities.
Then the program checks for duplicates based on CRC-F and asks you what
to do if any is found. This step is skipped if you have already agreed
to create a CRC-S duplicate, as it is assumed that you won't have changed
your mind since.
Most fields are read-only, as they represent fixed disk characteristics.
If you insist on editing them, you can check "Unlock editing" in "Setup-->Options-->Database".
The fields are similar to those found in the dialog called by "Disk-->Properties",
with a few extra:
- ID. This is an unique identifier (aka primary key) associated
with your disk. It is a good idea to write this number on the floppy disk
label, so you can quickly identify it later.
- Scanned date and time. This is the time and date when the
disk was added to the database.
- Drive type. This can be DOAD or PC99 for disk image files
on your PC, TI99 for floppies accessed from a remote TI-99/4A, or Bug99
for virtual floppies emulated in Bug99.
- Drive location. This is one of the few fields that can be
freely modified. For PC-resident disk images, it contains the file name
and path and you should probably leave it so. For remotely scanned disks,
it contains the drive name, which is not terribly useful. You may want
to replace it with the physical location of the floppy, e.g. box number,
shelf where it is stored, etc.
- Info1 and Info2. These two text fields are free for
you to use. They are indexed for fast searching, and limited to 256 characters.
You can enter whatever you want in there, but my advise is to use a system
of keywords. For instance, Info1 could be "Game", "Application", "Text
document", or "Data file", whereas Info2 could be the language in which
a program is written, or the program that created a data file.
- Info3. This is a "memo" field, which has no limitations in
length, but cannot be used for sorting in a query. It is meant for you
to enter a more verbous description of the contents of a disk or file.
Once you have edited disk information, click [OK] to commit your changes
to the database, or [Cancel] to leave the record unchanged, i.e. as it
was when the dialog poped up (this does not prevent adding the disk to
the database, just cancels your changes).
It's up to you to decide what you prefer. In general, it's better to have separate entries for duplicate files, but this may result in a lot of clutter. For instance, some people include a small CATLIST program on every TI-Basic or Extended-Basic disk they own. If you have a hundred such disks, it will results in 100 copies of the same file entry. In this case, it might be better to make only one entry and just tell VDM99 that a disk contains "the" CATLIST file. But once again, it's up to you.
Note that you can set an option in "Setup-->Options-->Database", to
automatically take the desired action when a duplicate is found. If you
didn't to so, but don't want to be asked the same question for every file
on the disk you just scanned, you can tick the "Do this for all files on
this disk" box prior to clicking one of the three buttons. Your choice
will be applied to every file on this disk, but you will be prompted again
next time you scan a disk. If you choose to reuse existing entries and
several duplicates are found, the first duplicate will be used during automatic
processing.
Click [OK] to validate changes, or [Cancel] to accept the entry as it is. If you get tired of reviewing each and every file, you can click [Finish] to skip the reviewing step for all remaining files.
And that's it. It looks complicated, but it's actually a straightforward
process. It takes longer to describe it than to do it...
In either case, you should mount the disk, select it, and do "Database-->Rescan disk". VDM99 will calculate the disk CRC-S and present you with a dialog box listing all possible entries that might correspond to this disk. If you were trying to determine the disk ID, write it down and click [Cancel].
If you have made changes to the disk, its CRCs changed and VDM99 will
return an empty list of matches. You should enter the disk ID in the text
field in the upper right corner of the dialog box and click the [Check
ID] button. This will display the disk record with that ID. If this is
the disk you want, click [OK] and this disk entry in the database will
be updated. Unless you disabled these options, you will be offered a chance
to review disk and file information, and be prompted for what to do with
duplicate files, if any. Note that the disk ID remains the same, but all
existing file entries will be deleted and new file IDs created (unless
a duplicate is found and you chose to reuse it).
First, you should display a disk query. Then you could either:
- Select one or more disks records in the List View and do "Database-->Mount
disk".
- Right-click on a query in the list and select "Mount disk" from the
context menu.
You should first display a disk query and select one or more disk records
in the List View. Then do "Database-->Remove disk". You will only be prompted
for confirmation if more than one disk is to be removed.
Name. This is the query name that will appear in the tree and in the "Saved queries" folder. So choose something suitably descriptive, e.g. "All 2010 disks" or "Empty files", etc.
Comments. If you are planning to save the query into the database, you may want to enter a somewhat more comprehensive description of what the query is meant for in this field.
FROM. This is the most important field: it detemines whether your query will return disk records or file records. It must be set once and for all when creating the query: you cannot change it later with "Edit query".
SELECT ALL. This is known as the 'predicate'. It controls the number of results that the query is allowed to return. Most of the times, you'll want this to be "ALL", but you can also select "TOP" to return only the top few results. A new field appears in which you can enter how many records you'd like to see (e.g. TOP 10). Alternatively, you could select "TOP x PERCENT", which works in the same way, except that the number you enter represents a percentage of the total records. So if you enter TOP 10 PERCENT and your query returns 150 records, the top 15 will be displayed. Finally, "DISTINCTROW" is used to remove duplicate results. Since each record has a unique ID number, duplicates can only happen when combining queries, which is an advanced feature described below.
WHERE. This text box is used to speficy search criteria. If you
leave it empty, all disk (or file) records will be returned.
The syntax is pretty simple: either [Field name] operator
constant
or [Field name] operator [parameter].
Several search criteria can be combined with AND and OR, using parentheses
if necessary (because A and (B or C) is not the same as (A and B) or C).
After a while, you'll probably type queries directly into the box, but
at the beginning you can use the controls above the text box to avoid syntax
errors.
- Select a field from the first drop list. The field names depend on
whether you elected to query the Disks or the Files table.
- Select a comparison operator from the second drop list. A reminder
appears under the text box to help you coin the constant field.
- Enter a constant value in the text field. String constants must be
enclosed in "double-quotes". Note that the VDM99 considers dates and CRCs
as strings.
- Click the [AND] or [OR] button. The first time, it doesn't matter
which button you click. But if you are adding more search criteria, you
should decide whether you want to combine them with AND or with OR. If
you need parentheses, you'll have to enter them directly into the WHERE
text box.
Most comparison operators are fairly straightforward (equal, not equal,
greater than, etc), but there are a few that deserves a bit more explanation:
BETWEEN serves to specify a range of valid values: enter a minimum
value, the word AND and a maximum value. E.g. [Size] BETWEEN 15 AND
20 or for strings [Type] BETWEEN "DF40" AND "DF80"
NOT BETWEEN is just the opposite of the above: enter a range of excluded
values.
IN serves to specify a list of legal values. The list must be enclosed
in parentheses, and values separated with commas. E.g. [Size] IN (360,720,1440)
Enclose values in double quotes for text fields.
NOT IN uses the same format to specify a list of illegal values that
will cause a record not to be selected.
LIKE mostly applies to text strings. It allows you to use the following
wildcards in your constants: ? means any character, * means any string
of zero or more characters, # means any digit from '0' to '9'. For instance,
you could enter [Archived date] LIKE "2011*" to accept any date
in 2011. You can also specify a list of valid characters enclosed in square
brackets (e.g. LIKE "xx[ACGT]xyz") or of invalid characters by
starting the list with an exclamation mark: LIKE "[!ACGT]" (to
include ! among the legal characters, make sure it does not come first).
Finally, the list can contain a range of characters, specified with a hyphen:
LIKE
"[A-F]" (to include the hyphen among legal characters, make sure it
comes first). In all cases, the specified group matches only one character.
NOT LIKE simply negates a LIKE comparison and selects records that
do not fit the LIKE comparison.
ORDER BY. This text box optionally lets you sort the results according to one or more field: just specify a valid field name enclosed in square brackets. If you leave this box empty, records will be returned in no particular order. You can specify the direction of the sort by following the field name with ASC for ascending (alphabetical for strings) or DESC for descending (reverse alphabetical). The default is ASC.
You can sort on more than one field, by separating fields with commas. In this case, results are first sorted according to the first field. Records that have the same first field are further sorted according to the second field, etc. For instance, to sort by time and date you could do: [Archived data],[Archived time].
Here also, you can enter text directly into the text box, or use the controls above it. Just select a field name, a direction for sorting, and click the [Add] button. Note that ASC is not appended to the field name, since it is the default.
Important: You cannot the Info3 field for sorting, as it is a "memo" field (unlimited length) and Microsoft's JetEngine database engine does not allow sorting or indexing memo fields.
Display. This box allows you to specify the layout of the List View, which will be used to display the query results. It works just like "View-->Customize list" (see above), and was only included in this dialog for your convenience. You can always leave it blank to use the default layout, or call "View-->Customize list" later.
[OK] Saves the query into the tree, runs it, and displays results in the list view.
[Cancel] Dismisses the dialog without creating (or modifying) the query.
The same dialog box is used to modify queries with "Database-->Edit
query", except that in this case the "FROM" field is read only.
In either case, you will be presented with the same dialog box that
was used to create the query, pre-filled with the current values. Note
that, for standard "select" queries, you must keep the table (Disks or
Files) that was chosen when creating the query.
You can save a query in the database in several ways, all equivalent:
- Drag a query into the "Saved queries" folder.
- Select a query (which will run it), and do "Database-->Save query"
- Right-click on a query (which will not run it), and select "Save"
in the context menu.
If a query with the same name already exists in the database, you will
be asked if it's ok to replace it. Click [OK] to overwrite the database
entry, or [Cancel] to cancel the operation (which means your query won't
be saved).
Since saving a query produces no visible effect, when the "Saved queries"
folder is not being viewed a message box pops up to inform you that the
query was saved successfully.
A copy of the query will be placed in the database subtree, and executed immediately (which will likely change the contents of the List View). If several queries are mounted at once, only the last one is executed.
Note: When you save a "combined" query, its record inside the database
includes the type of combination and the name of the parent query. When
you load such a query, VDM99 will attempt to mount it on its parent. To
do so, it first searches the Tree View for a query with a name matching
the parent. If none is found, VDM99 looks among saved queries and, if it
find a query with the parent's name, mounts this query first. Then
the combined query is mounted on its parent. If VDM99 cannot find the parent
query, it will mount the selected query at the current location of the
cursor (which may be another query that will then serve as parent), or
in the database root if the cursor is not on a suitable parent query. This
process is recursive, so you can load the parent query, the grand-parent,
the great-grand-parent, etc, by selecting the last query in the chain.
Just make sure there is no circular reference (a parent having its child
as a parent) as this would result in a forever loop.
To delete a query from the tree view, you have two solutions:
- Select the query (which will run it) and do "Database-->Delete query".
- Right-click on the query (which will not run it) and select "Delete"
from the context menu.
To remove a query from the database, first select the "Saved queries"
folder so as to display its contents. Then
- Select one or more queries in the list and do "Database-->Remove
query". You will only be asked for confirmation if more than one query
is to be removed.
- Right-click on a query and select "Remove" from the context menu.
Name: The query name that will appear in the tree and in the "Saved queries" folder.
Comments: An optional of what the query is does, to be saved into the database.
The big text box is there for you type the SQL command into. You can use the drop lists above it to select field names or paramters. A name is copied into the text box when you close the drop list.
You must then decide whether your query returns results or performs an action (i.e. is a command). This is an important distinction, an the two types of queries are run differently. For instance, UPDATE performs an action and does not return any results, whereas SELECT returns results but does not modify the database.
Display: If your query returns results, you can customize the layout of the List View, to be used for this query only. If you leave it empty, all fields returned by the query will be displayed, in the order they are returned, using the default column size. You can select a field name from the leftmost drop list. Note that you have to option to specify fields by number rather than by name: [#0] displays the first field returned by the query, [#1] the second, etc. (This also works for standard queries, by the way).
[Run now] Allows you to execute a query without dismissing the dialog box. It is mostly useful with command queries, and lets you perform several actions in a row, or perform a one-time action without having to create a query in the tree. If the query is a command, a message box pops up to let you know how many fields were modified. If you realized you made a mistake, you can click [Cancel] to cancel the changes and 'roll back' the database.
[OK] Places the query in the tree and runs it. If the query returns results, these will be displayed in the List View. If the query performs an action, a message box pops up to let you know how many records were affected by the action. Click [OK] to commit the changes, or [Cancel] to roll back.
[Cancel] dismisses the dialog box without creating (or modifying)
the query. Also cancels all changes to the database that may have been
introduced with [Run now].
By default, a text parameter is created with empty value and comment
fields. You should thus click into the List View to modify these. The parameter
type can be Text, Num (for numeric), or Bool (boolean). Boolean values
can be Yes, No, True or False. Quote marks should not be used for text
or boolean values, as the database engine adds them automatically. To finish
editing a field, just click out of it.
UPDATE Here you decide whether you wish to update disk records, or file records (You can't do both at the same time. To update queries or parameters, use a SQL command).
SET Here you enter the name of the field you with to modify, and the new value it should take. Arithmetic expressions are allowed, e.g. [Size] = [Size]+1 or [Info1] = [Info1] & "Keyword" (& is the concatenation operator, to be used when joining strings together).
WHERE Allows you to restrict changes to a subset of records. The syntax is identical to that of the WHERE clause in standard queries, and has been described above. This clause is critically important, as otherwise all records in the table will take the value specified in SET (if you make such a mistake, just click [Cancel] to dismiss the dialog box without committing changes).
So in our example, the final command would look like this: UPDATE [Disks] SET [Drive] = "C:\TI99\Disks" WHERE [Drive] = "C:\TI99" In this way, only the records that have C:\TI99 as a drive location will be updated.
[Update] Performs the update. You can execute several commands successively before leaving the dialog box. After each update, a message box pops up indicating whether the command was successful and how many records were modified.
[OK] Dismisses the dialog box and confirms any change that was made with [Update]. Of course, if you did not click the [Update] button, nothing will change.
[Cancel] Dismisses the dialog box and cancels any changes that
were made with the [Update] button (i.e. rolls back).
Parameters are variables that you can use in your queries. For instance,
instead of typing [Size] = 360, you could use [Size] = [Limit],
where "Limit" is the parameter name.
Why would you want to do this? There are several reasons:
- If you have a lot of queries that include a check for the same value,
using a parameter allows you to change all these queries by just changing
the value of the parameter.
- In some cases, you may want to include a parameter in a query without
adding it to the parameter folder. In this case, VDM99 will prompt you
for the value each time you run the query. For example, the query [File
name] = [Name] will prompt you for the name of the file to look for.
- Finally, VDM99 internally defines a bunch or parameters that you
may find convenient. For instance [Today] contains the current date and
[Path] the current application folder. These do not appear in the "Parameters"
folder.
To create a new parameter, open the parameter folder and select "Database-->New
parameter". Enter the parameter name directly in the List View. Avoid names
that correspond to record fields (e.g. [Disk name], [Size], etc) as they
would not be used: the corresponding field is used instead.
You must then specify the parameter type, value, and an optional comment.
This can be done by clicking into the List View, in the corresponding column.
When done, click out of the column to commit changes.
- Name. This is the variable name, to be used in your queries.
- Type. This should be either "Text" for string parameters, "Num" for
numeric parameters, or "Bool" for boolean parameters (the field [DS], [DD]
and [Protected] are booleans and must be compared to boolean parameters).
- Value. Enter the parameter values. Text values should not be enclosed
in quote marks, as the query automatically adds them for string parameters.
Legal boolean values are Yes, No, True and False.
- Comments. This is an optional field, in which you can enter a short
description of what the parameter is for, or which query uses it.
To delete parameters, select one or more in the list and do "Database-->Delete
parameter". You will only be asked for confirmation if more than one parameter
is to be deleted.
In addition, VDM99 remembers the last disk you selected while viewing
a disk query, and the last file selected while displaying a file queries.
These are used to derive a bunch of built-in parameter, by combining the
name CurDisk with a disk field, or CurFile with a file field
(using a space as separator). For instance [CurDisk ID], [CurDisk Disk
name], [CurFile CRC], etc.
You can also specify the parameter type: text, number or boolean. Be aware that setting the wrong type for a boolean parameter will cause a "Type mismatch" error that will cause an application after you left the program. So if you use a boolean field in your query (these are [DD], [DS] and [Protected] ) together with a parameter, make sure that the parameter type is boolean! Alternatively, leave the type on "auto", in which case a valid number will set the type as numeric, whereas "yes", "no", true" and "false" (case-independent) set the type as boolean.
If you wish, you can tick the "Save into database" box, and VDM99 will
place your parameter in the parameter folder when you click [OK].
It is possible to combine two or more queries, i.e. to run a query
on the results returned by another. There are several types of combination
available, depending on whether you are combining queries of the same type
(disk-on-disk or file-on-file) or of different types.
To combine a query with another, you can:
- Drag-and-drop a query onto another in the tree view (which will remove
it from its original location).
- Cut-and-paste a query onto another (the original stays in place,
a copy is made at the new location).
- Select an exiting query before you do "Database-->New query" (the
new query will be combined with the existing one).
In all cases, you will be presented with the standard query dialog box.
You will notice two new controls, though, in the upper right corner:
- A read-only text box that displays the name of the "parent" query,
i.e. the query with which the currently edited query must be combined.
- A drop-list with the available types of combination. By default,
the type is "Standalone", which means the query will not be combined. If
you leave it so when you click [OK], the query will be moved to the database
root, and not combined with the expected parent. Available combinations
depend on the query type (Disks or Files) and on the type of parent query.
For instance, if you wanted to find all DV80 files in disk images residing
on your PC, you would create the following parent query:
SELECT ALL * FROM [Disks] WHERE [Drive] = "DOAD" OR [Drive] = "PC99"
and mount the following file query onto it:
SELECT DISTINCTROW * FROM [Files] WHERE [Type] = "DV80"
Simple enough, isn't it?
For example, if you wanted to know which of your many floppies contain
the "CATLIST" file, you would create the following parent query:
SELECT ALL * FROM [Files] WHERE [File name] = "CATLIST"
and mount the following disk query onto it:
SELECT DISTINCTROW * FROM [Disks] WHERE [Drive] = "TI99"
INTERSECT Selects only the records that were returned by both queries. Since it is applied to the same table (either Disks or Files), this is equivalent to combining the WHERE clauses of the two queries with an AND. (And this is more or less how it is implemented, as Microsoft's version of SQL does not support INTERSECT).
UNION Pools both sets of results, making sure that records that are returned by both queries only appear once. This is equivalent to combining the WHERE clauses with OR, and this is how it is implemented (kind of) since Microsoft's database engine cannot perform UNION on records that contain "memo" fields (Info3 is a memo).
UNION ALL Just pools the two sets of results, whithout filtering out duplicates. If you don't want duplicates, you could change the predicate to SELECT DISTINCTROW, which would return the same results as a regular UNION.
LEFT JOIN This combination is normally used to merge different tables, on the basis of a field (aka column) they have in common. Here we are applying it to the same table, so it just selects records by comparing each record in the parent query with every record in the child query, based on a field that you specify. A new text box appears when you select this combination type, in which you should enter which field you whish to compare to which, and how. The syntax is a bit peculiar, so better use the controls on the left to fill the box: select a field from the drop-list and click [Add]. You will see something like [this].[CRC] = [parent].[CRC] , which means that file records will only be kept if their CRC fields match, which is a good way to detect duplicates. The [this]. and [parent]. notation is necessary so that the database engine knows in which of the two queries is the field you want to consider.
Note that you could use other type of comparisons than the equality, or compare different fields. The above example (known as an "equijoint") is just the most frequent case.
You will have noticed that clicking the [Add] button also resulted in adding the following filter to the WHERE box: [this].[ID] <> [parent].[ID] This is meant to prevent a record from selecting itself, in case it is returned by both queries (you can remove this if you want). Incidentally, if you add more selection criteria to the WHERE box, you must use the [this]. (or [parent].) notation prior to the field name, otherwise you will get an "ambiguous field reference" error. The same goes for the SORT BY box, but not for the display box, as VDM99 knows that display instructions always refer to the present query. You do not need to amend the parent query in the same way, as the parent cannot refer to the child.
The above example works well to detect file duplicates (i.e. two files
only), but with more replicates it tends to clutter the list of results.
For instance, triplicates would return six records, because #1 selects
#2 and #3, whereas #2 selects #1 and #3, and #3 selects #1 and #2. With
quadruplicates, you would have 12 records, etc. To prevent this problem,
just change the predicate to SELECT DISTINCTROW.
Use full folder names: Decides whether the "PC" folders (yellow) in the tree view should display the full path name, or the abbreviated (and editable) name. This option is also accessible from the View menu.
Show remote devices: Decides whether the drives in the Bug99 subtree should be grouped by device, and those in the TI-99/4A tree by card CRU. This option is also accessible from the View menu.
Sectors per line: How many characters, each corresponding to one sector, should there be in Sector Map line.
Show sectors beyond disk size: If this box is ticked, 1440 sectors are always shown (those beyond the disk size are labelled X, attempting to edit one may results in an error). If the box is unticked, the number of sectors displayed is taken from the disk size announced in the disk directory (sector 0).
Buffer: Decides what to buffer when accessing drives on a remote TI-99/4A. Buffered sectors are read only once from the remote system, then the local copied is accessed for further read operations (write opeartions are directed both to the buffer and the remote system). This can speed things up considerably, but may lead to strange side effect if you change the remote disk and neglect to inform VDM99. Also, write errors cannot be detected. Thus, you have the option to control what should be buffered. Nothing: no buffering, sectors are always read from the remote system. Sector 0+1+FDR: sectors 0 and 1 are buffered locally, as well as the FDR of the file currently in use. Whole disk: the whole disk is progressively buffered; as you read new sectors from the remote system they are saved locally. This setting also applies to Bug99 drives, but the "Whole disk" option is not available and defaults to "Sector 0+1" when selected. Disk-image files on the PC are never buffered.
Save VDP mem: Decides whether VDP memory on the TI-99/4A must be preserved when executing sector read/write operations. Checking this box makes sector transfers 3 times slower (since VDP memory must be saved before each sector access, and restored afterwards). On the other hand, if this box is not checked, VDP addresses >2000-20FF will be overwritten upon reading/writing to a remote drive, which may be a problem depending which application is currently running on the TI-99/4A. If you're not doing anything special on the remote TI, just leave the box unchecked to speed up transfer.
Save on exit: Decides whether the workspace should be saved when
exiting the program via Drive-->Exit (nothing is saved if you just close
the application window). Possible options are: Always, Never, and Ask me.
With the later, a message box will appear upon exit, asking you whether
you want to save the workspace or not.
Tab stops: Column positions (in characters) of the tabulator stops. When importing a file from the PC to a TI disk, a tab character will be replaced with enough spaces to reach the next column in your list that is greater or equal to the current position. For instance, if your first tab stop is 7 and a line begins with "TEST<tab>NOP" then <tab> will be replaced with 3 spaces, so that NOP begins in column 7. If you do not wish to use this feature, leave the list empty.
Then replace tab with xx spaces: If the current character in the line is already beyond the last tabstop specified in the above list, it will be replaced with a fixed number of spaces, which you can specify here. This number can be zero, in which case the tab character is simply removed.
Replace tab on import: Defines the default behaviour when importing files from the PC to the a TI disk. You will have another opportunity to change this when executing the "File-->Import" command, but not with "File-->View-->As text".
Create tabs on export: Defines the default behaviour when exporting
a TI file to your PC. Again, you will be given a chance to change this
when calling the "File-->Export" command. If you choose to create tabs,
any space (or stretch of spaces) preceeding a tab stop will be replaced
with a tab character. For instance "TEST NOP" would become
"TEST<tab>NOP" if you had a tabstop in position 9.
Contact: Here you decide whether to contact a real TI-99/4A, or a third party emulator posing as a TI-99/4A. The later assumes that the author of the emulator has included the appropriate code in his program. Instructions on how to do this can be found in the file "Emulators.txt" that's part of this package. To my knowledge, only Tursi's Classic99 offers this option.
Parallel | Serial: Select the type of connection you wish by clicking the appropriate radio button. This field controls the layout of the rest of the dialog box, so I shall discuss parallel and serial settings separately.
Parallel connection
PC port used: Here you should enter the hardware address of the PC parallel port you want to use (e.g. 0x2BA). If you do not know the port address, you could pick the port name from the drop list. Be aware, however, that the address of a given port depends on the total number of parallel ports on your PC (because the PC BIOS attribute the first address to the last port, and don't ask me why). Thus, if you mean to use LPT1, make sure to select "LPT1 single port" if your PC has only one parallel port, "LPT1 two ports" if it has two, and "LPT1 three ports" if it has three parallel ports.
Handshake in: Here you select the PC line which is connected to the "Handshake in" line in the PIO port of the TI-99/4A. If you built your parallel cable according to my instructions, this should be "Strobe*".
Handhake out: Here you select the PC parallel line that senses
the "Handshake out" output in the PIO port. If you followed my instructions,
it should be "Busy*".
Serial connection
PC port used: Here you should type the name of the serial port you wish to use, e.g. COM1, COM2, etc. Some default values are provided in the drop list, but if you are using a USB-to-serial converter, the port may have an exotic name (e.g. COM9), which you should simply type into this field.
DTR: Decides which line in the PC serial port controls the DTR input of the RS232 card on the TI-99/4A. This could be DTR for a straight serial cable, RTS with a crossed cable, or none (not recomended).
DCD: Which PC line receives the DCD output from the TI-99/4A. Possible choices are DCD (straight cable), CTS (crossed cable), DSR, or none.
CTS: Which PC line receives the CTS output from the TI-99/4A. Possible choices are DCD, CTS (optional in straight cable), DSR, or none (crossed cable). This line is not used by the default version of the hook routine. If you want to use it, you should reassemble the serial hook after changing the line HOUT EQU DCD into HOUT EQU CTS1 (use CTS2 for RS232/2 or RS232/4).
Bauds: This should be set as 9600, unless you reassembled the hook routine with a different BAUD value, or patched the EA5 file accordingly (e.g. with the Sector Editor). See below for details.
Stop bits: This should be set as 1, unless you changed the hook routine.
Parity: Should be "none" unless you modified the hook routine.
Pause before each byte: Causes VDM99 to pause for 2 milliseconds before sending a byte over the serial port, to give the TI-99/4A time to process the previous byte.
To ensure proper communications you should either enable pausing, or select a handshaking line. Otherwise, transmission overflow may occur at speeds higher then 1200 bauds, as the PC is sending bytes faster than the TI-99/4A can process them. Note that the "Upload hook" command overrides some of these settings: it enables pausing and temporarily disables handshake by DCD and CTS. This is necessary because the ROM routines in the RS232 card do nor perform handshaking upon reception. Bauds rate and parity are taken from your settings, which allows you to try different parameters if you whish (just remember to do it in TI-Basic too:e.g. CALL LOAD("RS232.BA=1200.DA=8.PA=E.CR"). Your full settings will be reinstated as soon as the hook is uploaded.
In summary, possible settings for a straight cable are:
DTR: DTR
DCD: DCD
CTS: None
Bauds: 9600
Stop: 1
Parity: None
Pause: No
or
DTR: DTR
DCD: None
CTS: None
Bauds: 9600
Stop: 1
Parity: None
Pause: Yes
And for a crossed cable:
DTR: RTS
DCD: CTS
CTS: None
Bauds: 9600
Stop: 1
Parity: None
Pause: No
or
DTR: RTS
DCD: None
CTS: None
Bauds: 9600
Stop: 1
Parity: None
Pause: Yes
Other controls
Timeout value: Decides how many times the PC will attempt to contact the TI-99/4A before announcing a communication error. This is an hexadecimal field and the default value is 00001000, wich is required for parallel transmission. You can set this value as 0 to disable timeout altogether. In this case, the only way to break a hung transmission will be to press <Escape>.
Xop used for breakpoints: This must be 1. On some machines 2 might also work, but it depends on the console ROMs, so VDM99 always uses 1.
Hook routine location: The hexadecimal address at which the hook routine currently resides in the TI-99/4A memory.
Hook routine workspace: The hexadecimal address of the workspace used by the hook routine.
[Move it]: This is meant for Bug99, which uses the same setup dialog. It allows you to enter new values in the "location" and "workspace" fields, and to move (and modify) the hook routine accordingly. This is useful for a debugger like Bug99, as it may be necessary to move the hook routine out of the way of the program being debugged. There is no reason to use this feature with VDM99, so leave it alone.
[Query hook]: This checks whether the remote TI-99/4A is answering,
and updates the hook location and workspace values. For this to work, you
must have loaded and launched the appropriate hook routine on the TI-99/4A.
Review disk info: Tick this box if you want to be given a chance to review disk information when adding a disk to your database.
Review each file info: Tick this box if you want to review information for all files, as they are entered in the database when you add a disk.
File duplicates: Here you can select a default action to be taken when a duplicate file is detected. Your choices are the same as in the "Duplicate found" dialog box: Create a new entry for this file, reuse the existing entry as it is, or reuse the existing entry but overwrite some fields (e.g. scanned date and time, info1 to 3, etc) it with the details of the new file. Or you could select "Ask me", in which case you will be prompted for the action to take each time a duplicate is detected.
Open on startup: Tick this box to open the current database when VDM99 starts up. The current database name is shown in the adjacent read-only file. To change it, just open (or create) another database.
Unlock edit: Ticking this box allows you to modify the fields
that are normally read-only in the "Disk record" and "File record" dialog
box. It's not advisable to do so as these fields should reflect the actual
characteristics of the disk and its files (if you've modified a disk, better
just rescan it), but if you really want to fiddle with these fields, you
can do it by ticking this box. The only field that's never editable is
the ID field, as it is the primary key of each table and essential for
database integrity. Note that this option is not saved with the workspace,
so you'll have to re-tick the box if you restart VDM99.
The VDM99.DSK disk contains the following files:
Filename    Format  Contents
----------------------------------------------------------------
HOOKPIO1    Prog    EA5 file for use with PIO/1
HOOKPIO2    Prog    EA5 file for  use with PIO/2 (i.e. the second RS232 card)
HOOKRS1     Prog    EA5 file for use with RS232/1
HOOKRS2     Prog    EA5 file for use with RS232/2
HOOKRS3     Prog    EA5 file for use with RS232/3 (on the second RS232 card)
HOOKRS4     Prog    EA5 file for use with RS232/4
HOOKPIO1_O  DF80    Objec file for use with PIO/1
HOOKPIO2_O  DF80    Objec file for use with PIO/2
HOOKRS1_O   DF80    Objec file for use with RS232/1
HOOKRS2_O   DF80    Objec file for use with RS232/2
HOOKRS3_O   DF80    Objec file for use with RS232/3
HOOKRS4_O   DF80    Objec file for use with RS232/4
HOOKPIO1_S  DV80    Source code for parallel port
HOOKRS1_S   DV80    Source code for serial port
In the dialog box, select an existing file or create a new one, preferably
with a VDM extension.
At the beginning of the source file, you'll see a bunch of EQU statements, a few of wich are part of a section marked "You may change the following if you wish". To change the baud rate, replace BAUDS EQU B9600 with the desired value (e.g BAUDS EQU B38400). Note that, for some speeds, you must also change the divisor flag in the control register by replacing DIVBY4 into DIVBY3 in the CTRLRG EQU line. The speeds that require this are clearly indicated in the EQU section: currently 1200, 19200 and 38400.
Then assemble the file (with the R option enabled) and load it as an EA3 file (DF80 format). Optionally, you could link it into an EA5 (program) file, for faster loading.
Alternatively, you could modify the existing DF80 or EA5 files directly,
for instance with the sector editor in VDM99. This implies locating the
proper values (0200 0027) and replacing them with the new ones (e.g. 0200
001A). Don't forget the control register: if DIVBY3 must be specified,
replace 0200 8B00 with 0200 8300. These values are hexadecimal in EA5 files,
but ASCII in the DF80 files with 'B' tag separators: B0200B0027 for instance.
All in all, it's probably easier to reassemble the source, but it's up
to you.
Some commands can be called with keyboard accelerators, aka shortcuts.
Note that some only work in advanced mode, or when a given file/sector
is selected.
Mount PC file
Ctrl-M
New PC file
Ctrl-N
Open workspace
Ctrl-O
Save workspace
Ctrl-S
Import File
Ctrl-I
Export File
Ctrl-E
Protect/unprotect file Ctrl-P
View file as text
Ctrl-T
View file hexadecimal Ctrl-X
Edit copy
Ctrl-C
Edit paste
Ctrl-V
Edit Find
Ctrl-F
Edit Find next
F2
Edit Find all
Shift-F2
Edit Replace
F3
Edit Replace all
Shift-F3
Mark sector free
Ctrl-0 (zero)
Mark sector used
Ctrl-1 (one)
Select/deselect sector Ctrl-2
Previous track/cluster Ctrl-Left arrow
Next track/cluster
Ctrl-Right arrow
Toggle "stay in file" F5
Swap targets
Ctrl-W
Safely abort operation F4
Abort remote transmission Escape
NB. <F4> can be used to abort lengthy operations, such as displaying a remote drive catalog, copying a disk file-wise or sector-wise, copying or comparing sectors, and checking a disk. You may have to hold this key down for a while, as it is only detected when it is "safe" to abort, e.g. after a file has been fully copied. A message box appears, asking you for confirmation. Click [No] to continue with normal operations, click [Yes] to abort. The F4 key will not work if communication with the TI-99/4A hangs.
By contrast, <Escape> is used specifically when accessing a remote TI-99/4A. It aborts transmission immediatly, even in the middle of a byte, and without asking for confirmation. This key should thus only be used when communications appear hopelessly stuck.
IMPORTANT: If you experience transmission problems, try to shield your cable. A parallel cable, especially a long one, makes a pretty good antenna and is thus prone to glitches. If you can't find shielded cable, simply wrap it in foil and ground the foil (e.g. by attaching it to the back of the PE box). This is perfectly serious.
If you still get transmission errors, check your soldering. A connection that is good 99.99% of the time still guarantees that reading a disk directory will fail almost every time.
PIO pin             cable        PC pin
=============================================
     D7 (#2)<------------------>(#2) D0
     D6 (#3)<------------------>(#3) D1
     D5 (#4)<------------------>(#4) D2
     D4 (#5)<------------------>(#5) D3
     D3 (#6)<------------------>(#6) D4
     D2 (#7)<------------------>(#7) D5
     D1 (#8)<------------------>(#8) D6
     D0 (#9)<------------------>(#9) D7
HandOut (#1)------------------->(#11)Busy
HandIn  (#10)<------------------(#1) Strobe*
    GND (#16)--,
    GND (#11)--+----------------(#18-25) GND
SpareOut(#14)------------------>(#10)Ack      (optional)
SpareIn (#13)<--------------+---(#16)Init*    (optional)
                            '-->(#12)PaperOut (optional)
        (#12) nc          nc -->(#13) Select
        (#15) nc          nc -->(#15) Error
                          nc <--(#14) AutoLF*
                          nc <--(#17) SelectIn
RS232 pin     cable      PC pin
===================================
RD (#2)<-----------------(#3) TX
TX (#3)----------------->(#2) RD
DTR(#20)<----------------(#4) DTR
DCD(#8)----------------->(#1) DCD
DSR(#6)----------------->(#6) DSR
CTS(#5)----------------->(#8) CTS (optional)
                       nc(#7) RTS
                       nc(#9) RI
GND(#7)------------------(#5) GND
RS232 pin     cable      PC pin
==================================
RD (#2)<-----------------(#3) TX
TX (#3)----------------->(#2) RD
DTR(#20)<----------------(#7) RTS
DCD(#8)----------------->(#8) CTS
DSR(#6------------+----->(#1) DCD
                  '----->(#6) DSR
CTS(#5) nc             nc(#4) DTR
                       nc(#9) RI
GND(#7)------------------(#5) GND
Fred's cable is equivalent to a splitter cable (converting the TI
DB25 connector to two DB9, to separate RS232/1 from RS232/2), followed
with a DB9-to-DB9 crossed cable (once common in the PC world). So rather
than building a dedicated cable, you could assemble one from two "off the
shelf" components...
RS232 pin  splitter cable   DB9  crossed cable   PC pin
=======================================================
RD (#2)<...................(#2) RD------------(#3) TX
TX (#3)...................>(#3) TX------------(#2) RD
DTR(#20)<..................(#8) CTS-----------(#7) RTS
DCD(#8)...................>(#7) RTS-----------(#8) CTS
DSR(#6)...................>(#4) DTR-------+---(#1) DCD
                                          '---(#6) DSR
                         nc(#1) DCD---,
                         nc(#6) DSR---+-------(#4) DTR
CTS(#5) nc nc(#9) RI nc nc(#9) RI
GND(#7)....................(#5) GND-----------(#5) GND
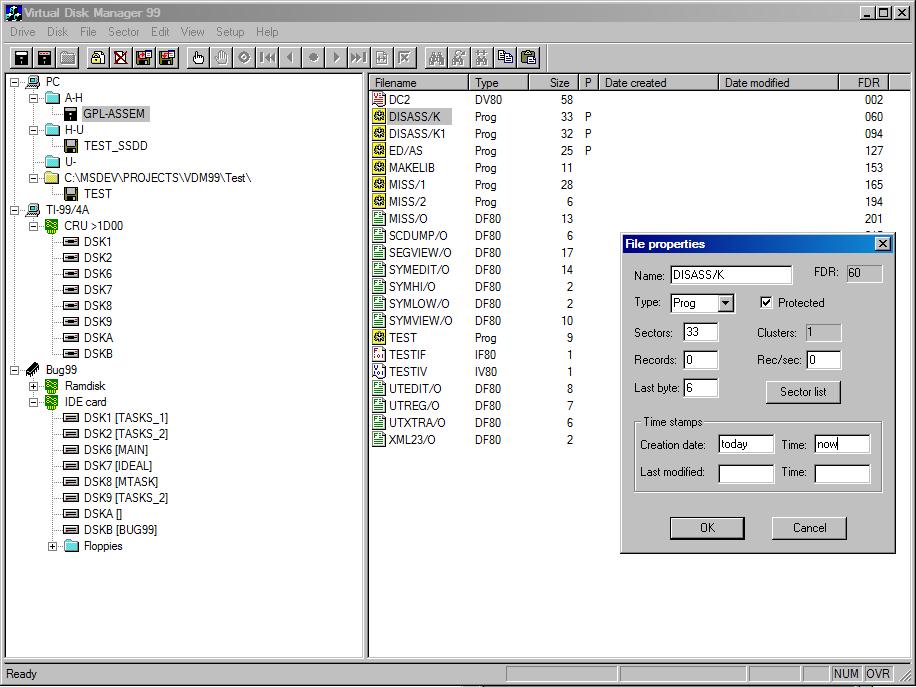
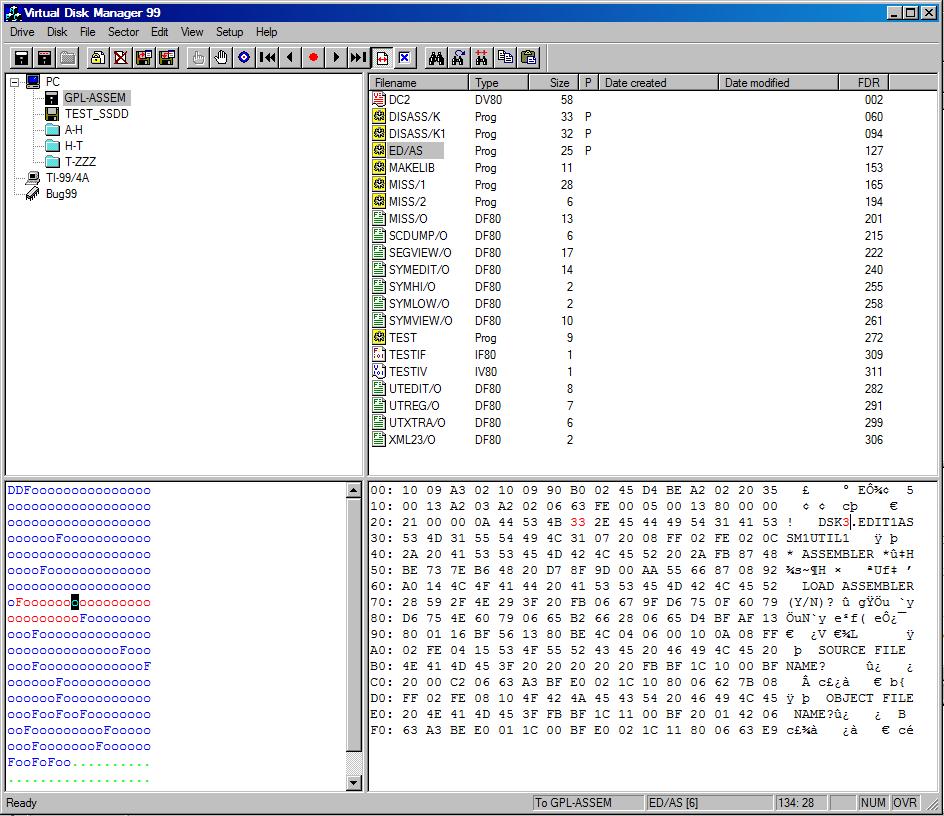
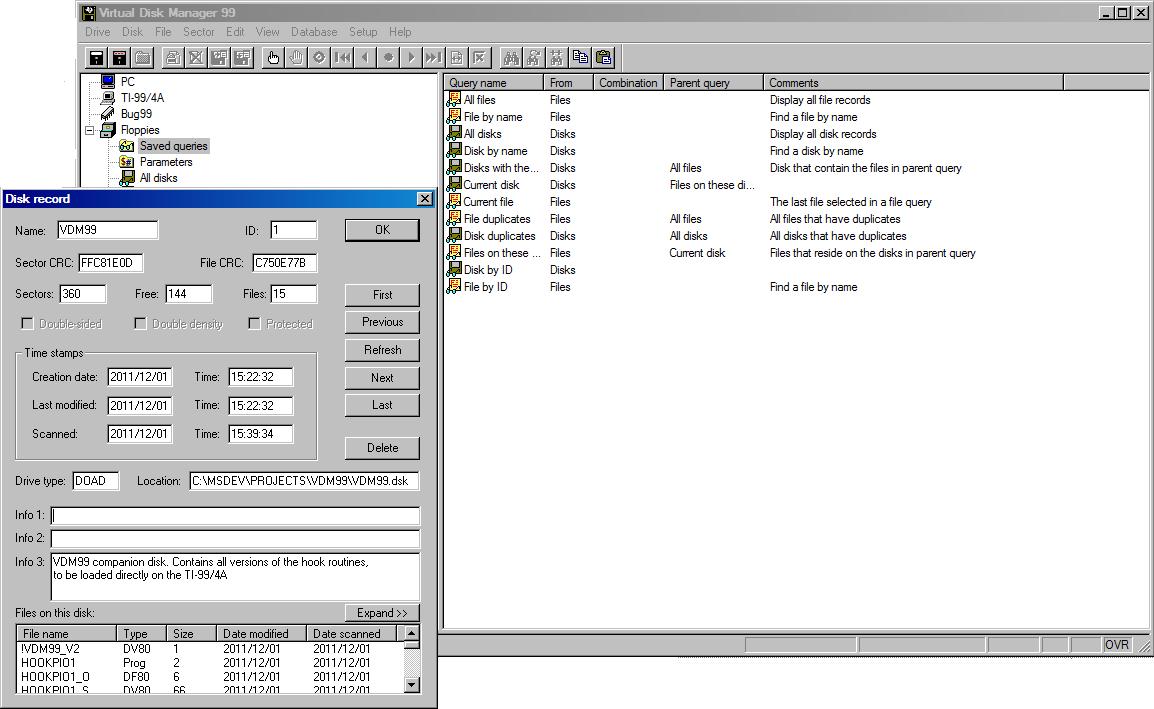