FAQ

Yareta

Accès rapide

General information

To support the impact, transparency, and reproducibility of scientific research, funders and publishers encourage or require data sharing whenever possible.

Some data, however, especially data containing confidential or personal information, cannot be shared openly. Sharing such data may also raise ethical concerns, for example where disclosure could affect people’s health or safety, the environment, or where the data could have potential military applications. Data sharing must therefore comply with applicable laws, regulations, institutional policies, data sharing agreements, and good practice.

DataTags, developed by Sweeney et al, 2015, offer a practical framework for assessing these issues. They support secure and legally compliant data sharing while maximizing transparency wherever possible. Each tag corresponds to a clearly defined level of protection and specifies how the data may be shared lawfully.

Six standardized DataTags levels are defined, from the most open to the most restricted:

  1. blue = public
  2. green = controlled public
  3. yellow = accountable
  4. orange = more accountable
  5. red = fully accountable
  6. crimson = maximally restricted
Tag Type Description Security Features Access Credentials Feature Support Access Level Compatibility
Blue Non-confidential information, stored and shared freely Clear storage, Clear transmit Open Fully supported Public Restricted Closed
Green Not harmful personal information, shared with some access control Clear storage, Clear transmit Email or OAuth verified registration Fully supported Restricted Closed
Yellow Potentially harmful personal information, shared with loosely verified and/or approved recipients Clear storage, Encrypted transmit Password, Registered, Approval, click-through DUA(1) Fully supported Closed
Orange Sensitive personal information, shared with verified and/or approved recipients under agreement Encrypted storage, Encrypted transmit Password, Registered, Approval, signed DUA(1) Partially supported (storage not encrypted) Closed
Red Very sensitive personal information, shared with strong verification of approved recipients under signed agreement Encrypted storage, Encrypted transmit Two-factor Auth, Registered, Approval, signed DUA(1) Partially supported (storage not encrypted) Closed
Crimson Maximum sensitive, explicit permission for each transaction, strong verification of approved recipients under signed agreement Multi-encrypted storage, Encrypted transmit Two-factor Auth, Registered, Approval, signed DUA(1) Partially supported (storage not encrypted) Closed


(1) Data Use Agreement

Yes, provided the scripts are written in Python.

A Python package is available via pip for interacting with the Yareta API.

All necessary documentation is available in the GitLab repository.

Jupyter Notebook with example use cases is also available, including an example showing how to create multiple deposits in a single operation.

Ready to use scripts are also available.

Yes.

Batch transfers between a UNIGE NAS storage space and Yareta can be managed through the Yareta APIs. Example Python scripts are available in a public GitLab repository to help automate transfer and processing tasks via these APIs.

Yes.

By default, Yareta automatically calculates checksums for files deposited on the platform. However, if needed, you may also calculate and manage checksums yourself. In that case, the checksums must be generated using an external tool, outside Yareta. At present, no specific tool is recommended for this purpose.

If the exact same file is added a second time within the same deposit, Yareta detects it as a duplicate and the deposit is assigned the status to "In error". The duplicate file must be removed before the deposit can be finalized.

See also How can you delete multiple files at once?

As Yareta is designed for long term preservation, the files in an archived deposit cannot be modified. Only archive metadata can be edited.

If you need to update archived files, you must create a new deposit containing the full set of files and then indicate that the earlier deposit has been made obsolete.

Follow these steps:

  1. Create a new deposit using the same metadata as the original one.
  2. Upload all files, including both unchanged files and any new or revised files.
  3. Reserve a DOI using the Reserve DOI button and note it down.
  4. Submit the new deposit using the Submit button.
  5. Open the original deposit by going to Deposit > Completed > Sort by publication date, then select the relevant deposit.
  6. Click Enable metadata editing.
  7. In the Associated data and publications section, enter the new DOI (from step 3) in the field Rendered obsolete by the following DOI, then save.
  8. Submit the metadata update for the original deposit using the Submit button.

Once the archiving process is complete, the original archive will publicly point to the new version containing the updated files.

No.

The content of OCR processed PDFs, that is, PDFs with optical character recognition, is not indexed in Yareta. This means it is not possible to search the full text of these files, either within an organizational unit or across Yareta as a whole, including in the case of open access deposits.

Organizational unit (Org.Unit)

An organizational unit is a logical entity that may represent, for example, a laboratory, institute, department, research group, or project. It allows you to manage team members and their permissions for depositing and archiving research data.

When naming an organizational unit, choose a short and clear name that accurately reflects the entity concerned. This could be, for example:

  • a laboratory or research group
  • a department
  • an institute
  • a large scale project with multiple partners
  • a small scale project generating large volumes of data

Where possible, we recommend using the name of your research group.

To customize the logo of your organizational unit, go to its page in the preservation space and click the default Yareta logo displayed on the left side of the page. You can then upload a new image from your computer.

The logo of a deposit can be customized in the same way.

Users and roles

Anyone can consult archives deposited in Yareta. However, only researchers affiliated with Geneva higher education institutions can deposit data in Yareta. To do so, they must have a SWITCH edu-ID account.

People outside these institutions who wish to implement a research data preservation and sharing solution similar to Yareta may use the OLOS platform.

To link your ORCID to your Yareta profile:

  1. Open the menu from your initials in the top right corner of the screen and select Profile.
  2. Click on Create or connect your ORCID iD
  3. If a confirmation dialog appears asking whether you want to stay on the page or leave it, confirm that you want to leave the page.
  4. Sign in on the ORCID website using your ORCID credentials.
  5. Once the process is complete, your ORCID will be linked to your Yareta profile and you will be redirected back automatically.

The Manager of an organizational unit may be a Principal Investigator (PI), a group leader, or any person with managerial and or financial responsibility for the organizational unit.

The Manager is responsible for:

  • knowing and applying good practices for the use of Yareta
  • ensuring that all members of the organizational unit are familiar with Yareta’s preservation policy and terms of use, and comply with them
  • granting access to non public archives
  • overseeing the management of team members (see the section What roles can members of the organizational unit have?)
  • delegating certain data management responsibilities to designated team members, where appropriate
  • overseeing the management of archives, including the quality and consistency of research data and associated metadata
  • monitoring notifications
  • serving as the main contact person for financial and billing matters

Team members can perform different actions depending on the role assigned to them within a particular organizational unit.

Action Guest (not authenticated) Guest (authenticated) Visitor Creator Approver Steward Manager (mandatory)
Search metadata of all archives and download data from public archives
Download data from restricted archives   ✓(1)
Download data from closed archives   ✓(1) ✓(2) ✓(2) ✓(2)
Create deposits      
Approve deposits       ✓(3)
Manage deposits and archives           ✓(4)
Manage organizational Unit and team member roles            

(1) Authenticated Guests may request access to restricted and closed archives and, where appropriate, be granted access on a case by case basis.

(2) Only Managers, Stewards, and authorized members of the organizational unit may download data from closed archives, on a case by case basis.

(3)Depending on the submission policy in place, Creators may either validate datasets themselves under the DEPOSIT WITHOUT APPROVAL policy or submit them to an Approver under the DEPOSIT WITH APPROVAL policy. The Approver may then approve the deposit, reject it, or return it for revision.

(4) The Steward role is recommended because it brings real added value to an organizational unit. Stewards may serve as key contacts for questions relating to data management, the definition and implementation of plans and procedures, the day to day operational and administrative management of deposits and archives, data quality assurance, and the consistent use of data resources within the organizational unit.

To do so, import a DataCite metadata file containing the relevant information, using the Creator element with the attribute nameType set to "Organizational". This is done via Add data > Advanced mode > Package > Metadata.

The imported metadata will then be merged with the metadata entered manually in Yareta.

Metadata

Yareta uses the DataCite metadata schema to support citation, discovery, and long term preservation. During submission, a minimum set of descriptive metadata is required in order to generate and assign a DOI (Digital Object Identifier) to each archive.

In addition to the default DataCite metadata, you may wish to add supplementary metadata files to your dataset. Yareta allows you to do this via Files > Advanced mode, by selecting Data category: Package and Data type: Metadata.

The Custom metadata type allows you to add a discipline specific metadata schema in a structured and machine readable format, such as XML or JSON. Yareta checks both the file type and whether its content conforms to the structure required by the schema.

If you need a new metadata schema to be added to Yareta, please contact the support team.

To edit the metadata of an archive:

  • Go to your deposits and select the deposit you want to edit.
    Note: the deposit must have the status Completed or Cleaned.
  • Click Enable metadata editing to make the necessary changes.
    Note: this action is only available to users with the Steward or Manager role.
  • When you have finished editing the metadata, click Submit to apply the changes to the published archive. To discard the changes instead, click Cancel metadata editing.

Volume

Yareta allows you to upload up to 6 GB at a time, whether as a single file or as multiple files uploaded together. However, there is no limit on the total size of a deposit.

If your data exceeds the 6 GB upload limit, please follow the procedure below.

1. Prepare your deposit in Yareta

  • Create a new deposit in your organizational unit and complete its metadata. If you need guidance, you can use the Deposit and Deposit metadata guided tours available from the menu in the top right corner of the Yareta portal.
  • Then copy the deposit identifier by clicking the key shaped icon in the top right corner of the deposit page.
  • Keep this identifier, as you will need it in step 3.

2. Prepare a shared storage space

Three options are available:

  • Option A for UNIGE researchers only: request research data storage space on the Academic NAS through the Service Catalogue, then create a directory named yareta.
  • Option B: if you use a private or local NAS, create a directory named yareta there as well, then provide the Yareta support team with access via SAMBA, FTP, or SFTP.
  • Option C: if neither of these options is suitable, contact the Yareta support team to request space on Yareta Staging.

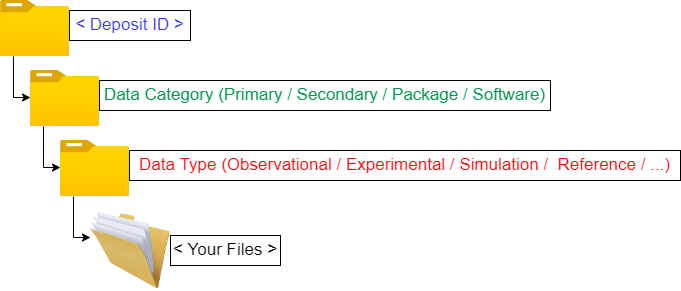
3. Select and organize your data in the shared space

  • In the yareta directory on your shared storage space, create a new subdirectory named with the deposit identifier copied in step 1.
  • Then organize your dataset according to the data categories and data types used by Yareta, using the documentation and the example shown in the diagram below as a guide(*).
  • If needed, an archive containing a sample folder structure is available on the Yareta portal. There is no need to delete unused folders, as Yareta will ignore them automatically.

(*) In line with good data preservation practice, compressed file formats are not accepted in deposits unless their presence is properly justified.

4. Notify the Yareta support team when your dataset is ready

Once your data is ready, inform the Yareta support team so that they can load it.

If you are using the Academic NAS, please provide the support team with the path to the relevant directory. It should begin with //nasac...

To find this information:

On Windows

  • Open Command Prompt by pressing Windows + R, typing cmd, and clicking OK.
  • In the command prompt, type net use S:, replacing S with the letter corresponding to your network drive, then press Enter.
  • The network path will appear on the Remote name line and will begin with \\.

On Linux or macOS

  • Open Terminal.
  • Type the command mount.
  • Locate the line corresponding to your mount point.
  • The network path appears at the beginning of that line and starts with //.
  • Please also provide the type of mount used, such as smbfs, cifs, or nfs, which is shown at the end of the line.

5. Check and archive your deposit in Yareta

Once the dataset has been loaded:

  • Return to your deposit in Yareta to check the imported files and complete any remaining data or metadata if necessary.
  • When everything is ready, click Submit.
  • Your dataset will be archived once the deposit has reached the status Completed. Depending on the volume of data, this may take some time.

If you need help with this procedure, or would like advice on the best way to upload your data based on its structure and volume, please contact the Yareta support team.

Example diagram:

YaretaFAQLDatasetfFolder.png

Errors

A file may be marked as “In error” for different reasons. For example, it may be a duplicate, contain a virus, or be affected by another issue detected during processing.

To identify the cause, open the detailed view of the file concerned, then click Show status history in the top right corner of the page.

If the message is not sufficiently clear, or if the error results from an issue you cannot address yourself, please contact the support team:

  • For UNIGE researchers: Support SI
  • For researchers from other Geneva higher education institutions: Request form

Excluded and ignored files correspond to file formats or patterns that the system identifies as being outside the scope of research data. Excluded files must be removed, while ignored files may, in some cases, require manual validation.

Excluded formats and patterns:

Ignored formats and patterns:

  • . lnk x-fmt/428
  • .zzz
  • Des sous-dossiers nommés : /old/
  • .zip, . rar, .tar et autres formats de fichiers compressés*.

(*) In line with good data preservation practice, it is strongly recommended not to archive compressed files such as .zip as they are. Instead, we recommend using the Structured upload function. This function automatically extracts compressed files while preserving their folder structure, and allows a description of the files they contain to be included in the deposit metadata.

If you archive a compressed file without extracting it first, users consulting the archive will not have access to this detailed metadata unless they download and extract the file themselves. If you nevertheless need to deposit a compressed file, make sure its contents are documented in a README file included in the deposit. Examples of README files are available on the Research Data portal.

Some file extensions may be incorrectly marked with the status “Ignored” by the Yareta detector. If this happens, you can correct the status manually by clicking the … button on the right of the relevant file row, then selecting Do not ignore.

If a large number of files are affected, you can apply the correction in bulk by selecting all the relevant files and then clicking Do not ignore.

Retention

Your data can be considered archived once the deposit containing it has been submitted and the archiving process has been fully completed.

From that point onward, the data can be shared through its DOI and can no longer be modified. Only the archive metadata may still be edited.

See the section How can you edit the metadata of an archive?

The retention period for research data depends on the nature of the data and the applicable regulatory framework.

At UNIGE, research data must be stored securely for at least five years after the end of the project, in accordance with section 2.6, “Primary data”, of the Directive Intégrité dans la recherche scientifique. If the person responsible for the project leaves the University before the end of this period, they must ensure that the data continues to be stored appropriately.

Personal data, however, must be destroyed as soon as it is no longer necessary for the conduct of the project, in accordance with Article 10 of LIPAD.

The Swiss National Science Foundation (SNSF) also recommends a minimum retention period of 10 years for research data, although this may vary depending on the discipline or type of data. See the SNSF FAQ, letter o, “Preservation and long-term storage of research data".

For more information on long term preservation options, see Archiving solutions at UNIGE.

Sharing

Yareta assigns a DOI (Digital Object Identifier) to each archive to facilitate data sharing and citation in line with the FAIR principles. A DOI ensures that your archive can be identified uniquely and permanently, and cited in scientific publications.

To share a dataset, simply share its DOI. You can find the DOI on the archive metadata page, either from the search results or from within your deposit. It follows this format: 10.26037/yareta:...

The corresponding link can be built as follows: https://www.doi.org/10.26037/yareta(...)

If the archive is public, the DOI gives access to the metadata and allows the associated data to be downloaded. If the archive is restricted or closed, only the metadata remains visible to unauthorized users, although they may request access to the data

If needed, you can also reserve a DOI while editing the metadata of your deposit. This can be useful if you need to cite your data in a scientific article that is still in preparation. Please note that the DOI will only become active once the deposit has been archived.

Restricted and closed archives can only be shared with users who are authenticated on the Yareta portal.

If you want to share such an archive with someone outside a Geneva higher education institution, that person must first:

  1. Create a SWITCH edu-ID account using an email address of their choice
  2. Sign in to Yareta once so that their Yareta profile is created automatically

Once this has been done, the archive can be shared in different ways depending on its access level.

If the archive is restricted :

Add the person to your organizational unit and assign them the role of Visitor. They will then be able to consult restricted archives, but will not be able to create or modify deposits.

If the archive is closed :

  1. Go to your organizational unit and click Manage archive access.
  2. Click Create, then select the archive concerned and the person with whom you want to share it.
  3. You may also set an expiry date for that access, if required.

A short demonstration video is also available to guide you through the procedure.

Deletion

If you need to delete a large number of files in a single operation, for example after importing thousands of files of which some are excluded, you can do so as long as the deposit has not yet been finalized. Once a deposit has been finalized, files can no longer be modified or deleted.

  1. Click File view to display all files in the deposit without the folder structure.
  2. Use the filters in the table header to display only the files you want to delete. For example, to show only excluded files, select the status Excluded files from the dropdown list.
  3. Tick the checkbox next to File name in the table header to select all files shown on the current page. Note: only the first 10 items are displayed by default. If more files match your criteria, you can select them all by clicking Select all X items in the search, which appears above the table when more than 10 results are found.
  4. Once all the relevant files have been selected, click Delete selection.

To request the deletion of a deposit, please contact researchdata-info(at)unige.ch.

Deposits may be deleted if:

  • they have not been finalized and there is no intention to finalize them; in such cases, any reserved DOI is not active and the files are neither accessible nor downloadable
  • their retention period has ended